Compile and install Digikam on Ubuntu
Digikam is an incredibly powerful media management tool that integrates a great collection of powerful media processing projects into a single, fairly nice and moderately intuitive user interface. The problem is that it make use of SO many projects and libraries that installation is quite fragile and most distributions are many years out of date – that is a typical sudo apt install digikam will yield version 4.5 while release is (as of this writing) 8.6.

In particular, this newer version has face detection that runs LOCALLY – not on Google or Facebook’s servers – meaning you don’t have to trade your personal photos and all the data implicit in them to a data broker to make use of such a useful tool. Sure, Google once bought and then improved Picasa Desktop which gave you this function, but then they realized this was cutting into their data harvesting business and discontinued Picasa and tried to convince people to let them look at all their pictures with Google Photos, which is massively creepy. We really, really need to make personal data a toxic asset, such an intolerable liability that any company that holds any personal data has negative value. But until then, use FOSS software on your own hardware where ever possible.
You can compile the latest version on Ubuntu 22.04 (Jammy Jellyfish), though not exactly painlessly, or you can install the flatpak appimage easily. I hate flatpaks with a passion (appimage is much better, it is self-contained, though still breaks the integration value of having a program installed on your computer just because library maintenance is tedious and devs can’t be bothered), so I went through the exercise and found what appears to be stable success with the following procedure which yielded a fully featured digikam with zero dependency errors or warnings and all features enabled using MariaDB as a backend.
Updating Ubuntu from 20.04 to 21.10 (or any other major update too) will (as typical) break a ton of stuff. For “reasons” the updater uninstalls all sorts of things like MariaDB and many of the dependencies. Generally, as libraries change versions, recompiling is required. This is so easy with FreeBSD ports…
Install and configure MariaDB
sudo apt update
sudo apt install mariadb-server
sudo mysql_secure_installation
The secure options are all good, accept them unless you know better.
Start the server (if it isn’t)
sudo systemctl start mariadb.service
sudo systemctl enable mariadb --now
sudo systemctl status mariadb.service
Do some really basic config:
sudo nano /etc/mysql/mariadb.conf.d/50-server.cnf
and set:
character-set-server = utf8mb4
collation-server = utf8mb4_general_ci
default_storage_engine = InnoDB
Switch to mariadb and create an admin user account and (I’d suggest) one for digikam as below. It seems this has to be done before the first connect and can’t be fixed after. You’ll probably want to use a different ‘user’ than I did, but feel free.
sudo mariadb
CREATE USER 'gessel'@'localhost' IDENTIFIED BY 'password';
GRANT ALL ON *.* TO 'gessel'@'localhost' IDENTIFIED BY 'password';
CREATE DATABASE digikam;
GRANT ALL PRIVILEGES ON digikam.* TO 'gessel'@'localhost';
FLUSH PRIVILEGES;
should correctly create the correct user – though check the instructions tab on the database connection options pane for any changes if you’re following these instructions for install of a later version. You will need the socket location to connect to the database so before exit; run:
mysqladmin -u admin -p version
Should yield something like:
Enter password:
mysqladmin  Ver 9.1 Distrib 10.3.25-MariaDB, for debian-linux-gnu on x86_64
Copyright (c) 2000, 2018, Oracle, MariaDB Corporation Ab and others.

Server version		10.3.25-MariaDB-0ubuntu0.20.04.1
Protocol version	10
Connection		Localhost via UNIX socket
UNIX socket		/var/run/mysqld/mysqld.sock
Uptime:			5 hours 26 min 6 sec

Threads: 29  Questions: 6322899  Slow queries: 0  Opens: 108  Flush tables: 1  Open tables: 74  Queries per second avg: 323.157
And note the value for UNIX socket, you’re going to need that later: /var/run/mysqld/mysqld.sock – yours might vary.
Install digiKam Dependencies
Updates 2021-10-30 🎃
- Updated to libx264-163 and libx265-199
- Added libopencv-dev dependency
- Version change from 7.2.0 to 7.3.0
Updates 2022-02-01 🧧
- Installing on Ubuntu 21.10 “impish”
- Version change to 7.5.0 (note camelcase used for file name now, “
digiKam” not “digikam“) - Problem with
libopencv-devrequired selecting a #sudo aptitude installsolution to get past alibilmbase-dev but it is not installableerror.
Updates 2023-09-29 🥮
- Installing on Ubuntu Ubuntu 22.04 “Jammy Jellyfish”
- Version change to 8.1.0 (note camelcase used for file name now, “digiKam” not “digikam”)
- libjasper4 → libjasper7
- version 8 migrated to QT6
- libx264-163 → libx264-164
- Qt x11 extras removed with QT6
- libqt5xmlpatterns5-dev replaced with Rajce plugin
- Marble (geolocation) won’t work with QT6 quite yet (as of writing). A patch was pushed 2023-09-24 but hasn’t hit repros.
Updates 2024-04-24 🌺
- Installing (still) on Ubuntu Ubuntu 22.04 “Jammy Jellyfish”
- Version change to 8.3.0
- libqt6networkauth6-dev avail and listed now.
- bootstrap failed without qtmultimedia5-dev, now listed, but I still get
QtMultimedia Support will be compiled.... NO (optional) - konadicontact is installed but version 4:22.04.3 and there doesn’t seem to be a PPA for updating, so that might have to wait for 24.04, Noble Numbat, which is expected any day. This might also fix the QtMultimedia issue. If it doesn’t I’ll file bug reports.
Updates 2024-12-09 🦙
- Version 8.5.0
- added libjxl-devtools dependency for DNG support
Updates 2025-03-23 🫔
- Version 8.6.0
- Official dependency list is now hidden in a .pdf file at https://files.kde.org/digikam/api/.
Digikam has just a few dependencies.… just a few... the below command should install the needed for 7.30 on Ubuntu 21.10. Any other version combination might be different. Things are a bit screwy between QT5 and QT6, apologies if this is mixed up:
sudo aptitude install \
bison \
checkinstall \
devscripts \
doxygen \
extra-cmake-modules \
ffmpeg \
ffmpegthumbnailer \
flex \
graphviz \
help2man \
jasper \
libavcodec-dev \
libavdevice-dev \
libavfilter-dev \
libavformat-dev \
libavutil-dev \
libboost-dev \
libboost-graph-dev \
libeigen3-dev \
libexiv2-dev \
libgphoto2-dev \
libjasper-dev \
libjasper-runtime \
libjasper7 \
libjpeg-dev \
libjxl-devtools \
libjxl-tools \
libkf5akonadicontact-dev \
libkf5calendarcore-dev \
libkf5contacts-dev \
libkf5doctools-dev \
libkf5filemetadata-dev \
libkf5kipi-dev \
libkf5notifications-dev \
libkf5notifyconfig-dev \
libkf5sane-dev \
libkf5solid-dev \
libkf5threadweaver-dev \
libkf5xmlgui-dev \
liblcms2-dev \
liblensfun-dev \
liblqr-1-0-dev \
libmagick++-6.q16-dev \
libmagick++-6.q16hdri-dev \
libmagickcore-dev \
libmarble-dev \
libqt5xmlpatterns5-dev \
libqt6core5compat6-dev \
libqt6opengl6-dev \
libqt6openglwidgets6 \
libqt6sql6-mysql \
libqt6svg6-dev \
libqt6networkauth6-dev \
qt6-webengine-dev \
libqt6webview6 \
qt6-webview-dev \
libqtav-dev \
libqtwebkit-dev \
libswscale-dev \
libtiff-dev \
libusb-1.0-0-dev \
libx264-164 \
libx264-dev \
libx265-199 \
libx265-dev \
libxml2-dev \
libxslt1-dev \
marble \
pkg-kde-tools \
qt6-base-dev \
qt6-base-dev-tools \
qt6-multimedia-dev \
qtmultimedia5-dev \
qt6-webengine-dev \
libopencv-dev \
qt6-webengine-dev-tools
8.6 requires libopencv >= 4.8.0 and DNG support now requires libjpegxl >= 0.7
Compile Digikam
Switch to your projects directory (~/projects, say) and get the source, cross your fingers, and go to town. The make -j4 command will take a while to compile everything. There are two basic mechanisms for getting the source code: wget the taball or git pull the repository.
Download the tarball
Check the latest version at https://download.kde.org/stable/digikam/ It was 7.3.0, but is now 8.1.0 and will, certainly change again. This is currently a 255.3 MB download (!).
wget https://mirror.csclub.uwaterloo.ca/kde/Attic/digikam/
tar -xvf digiKam-8.6.0.tar.xz
cd digiKam-8.6.0.tar.xz
git pull the repository
Git uses branches/tags so check the pull down list of latest branches and tags at the top left, below the many, many branches is the tag list at https://invent.kde.org/graphics/digikam/-/tree/v8.6.0 , latest on top, and currently 8.6.0. This is currently a 2.1 GB git pull (!!).
There was an issue in the v7.3.0 tag that caused built to fail that was fixed in current, so building “stable” isn’t always the best choice for stability. If you’re not upgrading, skip the delete directory command.
sudo rm -r digikam
git clone -b v8.6.0 https://invent.kde.org/graphics/digikam
cd digikam
Then follow the same steps whether gited or wgeted:
./bootstrap.linux
cd build
make -j4
sudo su
make install/fast
Compiling might take 15-30 minutes depending on CPU. Adjust -jx to optimize build times, the normal rule of thumb is that x=# of cores or cores+1, YMMV, 4 is a reasonable number if you aren’t confident or interested in experimenting. 8.3 also downloads the trained data sets on launch, which is kinda interesting, they are also a little chonky bitwise.
The ./bootstrap.linux result should be as below; if it indicates a something is missing then double check dependencies. If you’ve never compiled anything before, you might need to install cmake and and some other basics not in the apt install list above:
-- ----------------------------------------------------------------------------------
-- digiKam 8.3.0 dependencies results <https://www.digikam.org>
--
-- MySQL Database Support will be compiled.. YES (optional)
-- MySQL Internal Support will be compiled.. YES (optional)
-- Showfoto Support will be compiled........ YES (optional)
-- DBUS Support will be compiled............ YES (optional)
-- App. Style Support will be compiled...... YES (optional)
-- QWebEngine Support will be compiled...... YES (optional)
-- Geolocation Support will be compiled..... YES (optional)
-- Media Player Support will be compiled.... YES (optional)
-- QtMultimedia Support will be compiled.... NO (optional)
-- libboostgraph found...................... YES
-- libexiv2 found........................... YES
-- libexpat found........................... YES
-- libjpeg found............................ YES
-- libkde found............................. YES
-- liblcms found............................ YES
-- libopencv found.......................... YES
-- libpng found............................. YES
-- libpthread found......................... YES
-- libqt found.............................. YES
-- libtiff found............................ YES
-- bison found.............................. YES (optional)
-- doxygen found............................ YES (optional)
-- ccache found............................. YES (optional)
-- flex found............................... YES (optional)
-- libakonadicontact found.................. NO (optional)
-- digiKam will be compiled without KDE desktop address book support.
-- Please install the libakonadicontact (version >= 5.19.0) development package.
--
-- libimagemagick found..................... YES (optional)
-- libeigen3 found.......................... YES (optional)
-- libgphoto2 found......................... YES (optional)
-- libjasper found.......................... YES (optional)
-- libkcalendarcore found................... YES (optional)
-- libkfilemetadata found................... YES (optional)
-- libkiconthemes found..................... YES (optional)
-- libkio found............................. YES (optional)
-- libknotifications found.................. YES (optional)
-- libknotifyconfig found................... YES (optional)
-- libsonnet found.......................... YES (optional)
-- libksane found........................... YES (optional)
-- liblensfun found......................... YES (optional)
-- libglib2 found........................... YES (optional)
-- libthreadweaver found.................... YES (optional)
-- libxml2 found............................ YES (optional)
-- libxslt found............................ YES (optional)
-- libheif found............................ YES (optional)
-- libx265 found............................ YES (optional)
-- OpenGL found............................. YES (optional)
-- libqtxmlpatterns found................... YES (optional)
-- digiKam can be compiled.................. YES
-- ----------------------------------------------------------------------------------
Launch and configure Digikam
(if you’re still root, exit root before launching # digikam)
The Configuration options are pretty basic, but note that to configure the Digikam back end you’ll need to use that MariaDB socket value you got before and the user you created like so UNIX_SOCKET=/var/run/mysqld/mysqld.sock: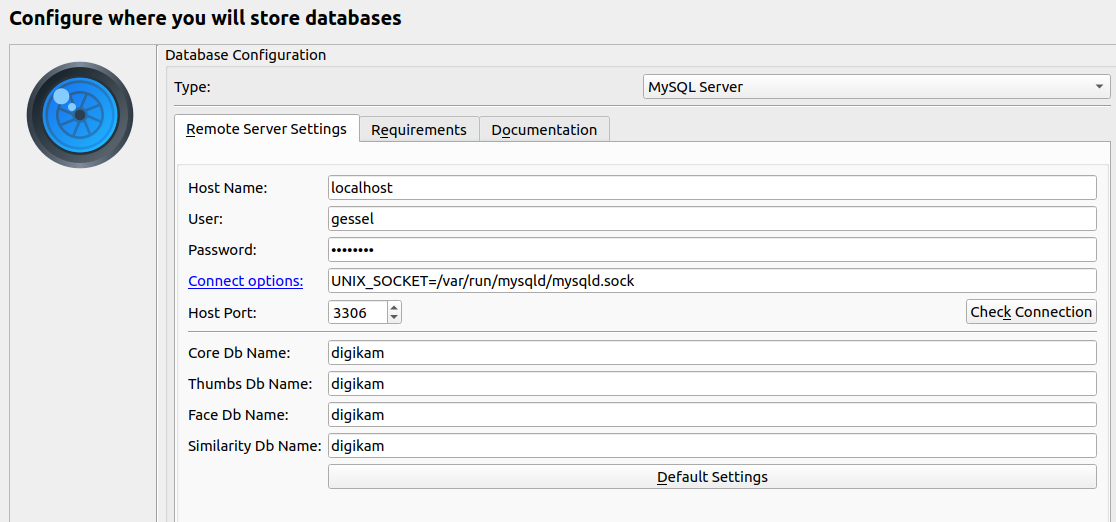
On the first run, it will download about 350mb of code for the face recognition engine. Hey – maybe a bit heavy, but you’re not giving the Google or Apple free lookie looks at all your personal pictures. Also, if all this is a bit much (and, Frankly, it is) I’d consider Digikam one of the few applications that makes the whole flatpak thing seem somewhat justified. Maybe.
Some advice on tuning:
I recommend mysqltuner highly, then maybe check this out (or just leave it default, default works well).
Tuning a database is application and computer specific, there’s no one size fits any, certainly not all, and it may change as your database grows. There are far more expert and complete tuning guides available, but here’s what I do:
Pre-Tuning Data Collection
Tuning at the most basic involves instrumenting the database to log problems, running it for a while, then parsing the performance logs for useful hints. The mysqltuner.pl script is far more expert at than I’ll ever be, so I pretty much just trust it. You have to modify your mysqld.cnf file to enable performance data collection (which, BTW, slows down operation, so undo this later) which, for MariaDB, means adding a few lines:
sudo nano /etc/mysql/mariadb.conf.d/50-server.cnf
# enable performance schema to allow optimization, but ironically hit performance, so disable after tuning.
# in the [mysqld] section insert
performance_schema=ON
performance-schema-instrument='stage/%=ON'
performance-schema-consumer-events-stages-current=ON
performance-schema-consumer-events-stages-history=ON
performance-schema-consumer-events-stages-history-long=ON
Follow the instructions for installing mysqltuner.pl at https://github.com/major/MySQLTuner-perl#downloadinstallation
I rather like this guide’s helpful instructions for putting the script in /usr/local/sbin/ so it is in the execution path:
sudo wget https://raw.githubusercontent.com/major/MySQLTuner-perl/master/mysqltuner.pl -O /usr/local/sbin/mysqltuner.pl
sudo chmod 700 /usr/local/sbin/mysqltuner.pl
sudo mysqltuner.pl
Then restart with sudo service mariadb restart then go about your business with digikam – make sure you rack up some real hours to gather useful data on your performance. Things like ingesting a large collection should generate useful data. I’d suggest doing disk tuning first because that’s hardware not load dependent.
Disk tuning
Databases tend to hammer storage and SSDs, especially SLC/enterprise SSDs, massively improve DB performance over spinning disks – unless you have a massive array of really good rotating drives. I’m running this DB on one spinning disk, so performance is very MEH. MySQL and MariaDB make some assumptions about disk performance which is used to scale some pretty important parameters for write caching. You can meaningfully improve on the defaults by testing your disk with a great linux utility called “fio”.
sudo apt install fio
fio --randrepeat=1 --ioengine=libaio --direct=1 --gtod_reduce=1 --name=test --filename=test --bs=4k --iodepth=64 --size=4G --readwrite=randrw --rwmixread=75
This will take a while and will give some very detailed information about the performance of your disk subsystem, the key parameters being average and max write IOPS. I typically create a # performance tuning section at the end of my [mysqld] section and before [embedded] and I’ll put these values in as, say: (your IOPS values will be different):
# performance tuning

innodb_io_capacity              = 170
innodb_io_capacity_max          = 286
and sudo service mariadb restart
Using mysqltuner.pl
After you’ve collected some data, there may be a list of tuning options.
sudo nano /etc/mysql/mariadb.conf.d/50-server.cnf
Mine currently look like this, but they’ll change as the database stabilizes and my usage patterns change.
# performance tuning

innodb_io_capacity              = 170
innodb_io_capacity_max          = 286

innodb_stats_on_metadata        = 0
innodb_buffer_pool_size         = 4G
innodb_log_file_size            = 512M
innodb_buffer_pool_instances    = 4
skip_name_resolve               = 1
query_cache_size                = 0
query_cache_type                = 0
query_cache_limit               = 2M
max_connections                 = 175
join_buffer_size                = 4M
tmp_table_size                  = 24M
max_heap_table_size             = 24M
innodb_buffer_pool_size         = 4G
max_allowed_packet              = 128M
and
sudo service mariadb restart
Note max_allowed_packet = 128M comes from this guide. I trust it, but it isn’t a mysqltuner suggestion.
Tagging MP3 Files with Puddletag on Linux Mint
A “fun” part of organizing an MP3 collection is harmonizing the tags so the datas work consistently with whatever management schema you prefer. My preference is management by the file system—genre/artist/year/album/tracks works for me—but consistent metainformation is required and often disharmonious. Finding metaharmony is a chore I find less taxing with a well structured tag editor and to my mind the ur-meta-tag manager is MP3TAG.
The problem is that only works with that dead-end spyware riddled failing legacyware called “Windows.” Fortunately, in Linux-land we have puddletag, a very solid clone of MP3TAG. The issues is that the version in repositories is (as of this writing) 1.20 and I couldn’t find a PPA for the latest, 2.0.1. But compiling from source is super easy and works in both Linux Mint 19 and Ubuntu 20.04 and version 2.20 on 22.04 which contains my mods to latinization of foreign scripts (yay open source!):
- Install pre-reqs to build (don’t worry, if they’re installed, they won’t be double installed)
- get the tarball of the source code
- expand it (into a reasonable directory, like ~/projects)
- switch into that directory
- run the python executable “puddletag” directly to verify it is working
- install it
- tell the desktop manager it’s there – and it should be in your window manager along with the rest of your applications.
The latest version as of this post was 2.0.1 from https://github.com/puddletag/puddletag
sudo apt install python3-pyqt5 python3-pyqt5.qtsvg python3-pyparsing python3-mutagen python3-acoustid libchromaprint-dev libchromaprint-tools libchromaprint1
wget href="https://github.com/puddletag/puddletag/releases/download/2.0.1/puddletag-2.0.1.tar.gz
tar -xvf puddletag-2.0.1.tar.gz
cd puddletag-2.0.1/
cd puddletag
./puddletag
sudo python3 setup.py install
sudo desktop-file-install puddletag.desktop
A nice feature is the configuration directory is portable and takes your complete customization with you – it is an extremely customizable program so you can generally configure it as fits your mental model. Just copy the entire puddletag directory located at ~/.configure/puddletag.