A seemingly common task would be to convert a talk or presentation given as a slide show into a playable video using a standards compliant format like WebM, which plays in almost all HTML 5 compliant browsers, that is just about everything but Safari on iOS (because Apple are walled garden asses) IE (because derp duh) and Opera Mini (because … well maybe too much work).
These days, WebM supports the pretty fantastic encoder AV1, which is the new thing that is genuinely open source and everyone should use for everything for this reason. It’s also absurdly slow to encode to, so maybe not everything, but it yields better results than VP9, which is also pretty decent. Compared to the H.series encoders (263/4/5/6), my results put VP9 between 4 and 5, depending on content and AV1 between 5 and 6, which is pretty solid and there aren’t too many tradeoffs with h/x.265 for most applications and you get FOSS freedom. Hopefully there will be much better hardware encoder support soon, though I’m sure we’re not gonna get that in iOS anytime soon. H.264 remains a pretty solid format for most use as it has broad and well optimized hardware compressors and decompressors. H.265 seems pretty well entrenched as well, but H.266 has been slow to pick up and very unscientifically I see AV1 as likely to undermine the H.266 adoption, though we’re still a long way from the necessary hardware for mobile/IoT devices to be confident of such an outcome yet.
I spent some time messing around with the process and testing various parameters. The fruit of that labor is as follows.
Export your slides into some useful format
The first step is exporting slides into a useful format like PNG. Assuming you have or can convert a presentation to PDF, then you can extract all the pages to individual files with pdfseparate, a command line tool that comes with poppler (which you’ll have because you run Inkscape, right? You should).
pdfseparate document.pdf %d.pdf
Then convert them to .png using inkscape like:
find . -type f -name "*.pdf" -exec inkscape "{}" --export-type=png --pdf-poppler -w 1920 -h 1440 -o "{}.png" \;
Set the width and height to meet your specific needs. Maybe 1920×1080? 1536×2160?
Extract or convert your audio file to wmv
This tutorial uses whisper to convert the audio file to text, which also makes it easy(ier) to get slide timings to about a second from the .vtt file whisper generates. The first step is converting the audio file to .wmv so whisper can eat it. I used ffmpeg (you need a recent version for AV1 support later so depending on distro, you might need to build it) to do this like
ffmpeg -hide_banner -i videofile.mkv -ac 1 audio.wav
Note that I am forcing mono audio with -ac 1 (and beware out of phase audio can cancel). I would expect most talks to not rely on stereo effects, but YMMV. Once you have this file and you’ve installed whisper (surprisingly easy), it will convert your long audio ramblings into equally (in)coherent text (the accuracy is surprisingly good) with a simple:
whisper audio.wav
At this point you should have a folder full of .png slides, an audio file of your talk in .wav, and a variety of text files in various text formats including a .vtt file that has time stamps in MM:SS.sss format and text and it is time for the first tedious bit. You need the from start HH:MM:SS.sss timing for each slide, plus the slide-to-slide timing in seconds (SSS), and it is helpful to have the from start seconds (SSSSSS) timing to verify key frame placement using ffprobe. Since Whisper’s .vtt file is only integer seconds, this isn’t going to be fractional second accurate timing, but good enough for slide transitions in a talk.
You could put this in a spreadsheet to automate the conversions from the .vtt’s format to the needed formats. I did it manually like this:
file 'QuantumComputingSlides1.png'
duration 00:28 28 28
file 'QuantumComputingSlides2.png'
duration 00:49 49 21
file 'QuantumComputingSlides3.png'
duration 00:55 55 6
file 'QuantumComputingSlides4.png'
duration 02:04 124 69
file 'QuantumComputingSlides5.png'
duration 03:49 229 105
You have to convert all those time stamps into absolute seconds. I haven’t automated this yet, but it should be doable with a little regexp and bash or python if you have a lot of slides. If I do this with a talk that has enough slides to justify the effort, I’ll post a converter script.
Convert the Stills to Video Clips
This part assumes no fancy transitions, just jump cuts and that each slide is meant to be on-screen for some amount of time, the audio droning on over it and, perhaps, subtitles below it. This isn’t high art, mind you, just a utilitarian conversion for web viewing. The first step is to determine the slide transitions points, which you’ll need in absolute time format and in seconds/slide format, data which should be pretty easy to access from the speech-to-text .vtt file:
WEBVTT

00:00.000 --> 00:05.000
Okay, today's talk is going to be about quantum cryptography and quantum computing.
(snip)
00:46.000 --> 00:49.000
So let's get right into it.
Slide one’s duration is 49 seconds and slide two should be shown at 00:00:49.000; collect this data for all the slides. Next, make text file for each slide that includes the slide file name (the .png file created earlier) and the duration (seconds on screen, not the absolute time). The files should look like this:
file 'QuantumComputingSlides3.png'
duration 6
file 'QuantumComputingSlides3.png'
Slide 3 will be shown for 6 seconds. The file name appears twice around the duration because of some quirk in ffmpeg’s concat function. You should now have in your folder each slide as a .png file and for each slide a .txt file that describes the duration in file system sortable order (slide01.txt, slide02.txt etc).
I put the video encoding command in a bash script to make it a bit easier:
#!/bin/bash
# AV1 compression single pass
for i in *.txt
    do name=`echo "$i" | cut -d'.' -f1`
    ffmpeg -hide_banner -f concat -i "$i" -y -vf fps=10 -c:v libsvtav1 -pix_fmt yuv420p10le -preset 3 -svtav1-params tune=0:color-range=1:keyint=60000:scm=1 -b:v 0 -crf 40 -an "${name}.webm"
done
what the settings mean:
-vf fps=10           set the output video frame rate to 10fps.   Why? Because timing works out. 5 might work too.
-c:v libsvtav1       use the intel encoder, it is like 10x faster than libaom.
-pix-fmt yuv420p10le use 10 bit encoding which makes gradients and dark areas better at a small cost, might as well.
-preset 3            this determines encoding effort.  3 was manageable. 2 took a loong time. YMMV
-stvav1-params       this passes parameters through ffmpeg to the CODEC
  tune=0             tuned for content rather than PSNR tests
  color-range=1      full (computer) color rather than studio color
  keyint=60000       don't put in extra keyframes at all, just starting I then all P frames
  scm=1              peeps say 1 is good for digital graphics and maybe animation, 0 is default for live action
-b:v 0               don't limit bandwidth (quality control only)
-crf 40              this is a very low target quality because there's no motion to worry about
-an                  no audio (for now)
Note that since iOS devices can’t do AV1 yet, it might be preferable to use the less efficient VP9 either as the sole version or as a fallback. This can be done with:
#!/bin/bash
# VP9 compression single pass
for i in *.txt
   do name=`echo "$i" | cut -d'.' -f1`
   ffmpeg -hide_banner -f concat -i "$i" -y -vf fps=10 -c:v libvpx-vp9 -pix_fmt yuv420p10le -deadline best -cpu-used 0 -b:v 0 -crf 40 -g 60000 -an "${name}.webm"
done
The options mean
-deadline best       means to use the highest quality, slowest encoding
-cpu-used 0          default is 0, but never hurts to be sure, best quality
-g 60000             libvpx-vp9 uses the ffmpeg "g" to set keyframe intervals
-lossless 1          seems like a good thing for slides, but yields quite large files
save and chmod+x and then execute
UPDATE
I had trouble with ffmpeg slide timing with the concat command, something I am apparently not alone in. I rewrote the conversion shell script to be a lot more robust, this reads a tab-delimited text file called files_to_encode.txt in a format of
file_one.png\t3.12
file_two.jpg\t25.344
...
and then executes ffmpeg to convert the images to single keyframe (and no intermediate frame) video files with one frame duration accuracy of the duration values – that is fractional values are allowed. The default of 20fps should be within 0.05 seconds of the target length.
#!/bin/bash

# Base directory - change this to your absolute path
BASE_DIR="/home/gessel/Work/Slocumisms/IPHROS/antigua/Short_Presentation/pages"

# Add logging
LOG_FILE="$BASE_DIR/encoding_log.txt"
PROCESSED_FILES="$BASE_DIR/processed_files.txt"

# Initialize log file with timestamp
echo "=== Encoding session started at $(date) ===" > "$LOG_FILE"

# Change to base directory
cd "$BASE_DIR" || {
    echo "Error: Cannot change to base directory $BASE_DIR" | tee -a "$LOG_FILE"
    exit 1
}

# Function to convert seconds to HH:MM:SS.msec format
convert_to_hms() {
    local total_seconds=$1
    local seconds=${total_seconds%.*}
    local msec=${total_seconds#*.}
    msec=$(printf "%-3s" $msec)
    msec=${msec// /0}
    local hours=$((seconds / 3600))
    local minutes=$(((seconds % 3600) / 60))
    local secs=$((seconds % 60))
    printf "%02d:%02d:%02d.%s" $hours $minutes $secs $msec
}

# First, ensure the input file is in Unix format
dos2unix -n "$BASE_DIR/files_to_encode.txt" "$BASE_DIR/files_to_encode.unix.txt"

# Read all lines into an array
mapfile -t lines < "$BASE_DIR/files_to_encode.unix.txt"

# Process each line
for ((i=0; i<${#lines[@]}; i++)); do
    line_number=$((i + 1))
    line="${lines[$i]}"

    # Debug logging for raw line
    echo "DEBUG: Line $line_number raw: '$line'" >> "$LOG_FILE"
    echo "DEBUG: Hex dump of line:" >> "$LOG_FILE"
    echo -n "$line" | xxd >> "$LOG_FILE"

    # Skip empty lines
    if [ -z "$line" ]; then
        echo "Line $line_number: Empty line, skipping" | tee -a "$LOG_FILE"
        continue
    fi

    # Split the line using parameter expansion
    filename="${line%%$'\t'*}"
    duration="${line#*$'\t'}"

    # Debug logging after split
    echo "DEBUG: After split:" >> "$LOG_FILE"
    echo "  Filename: '$filename'" >> "$LOG_FILE"
    echo "  Duration: '$duration'" >> "$LOG_FILE"

    # Validate input file exists
    if [ ! -f "$filename" ]; then
        echo "Line $line_number: Input file '$filename' not found" | tee -a "$LOG_FILE"
        continue
    fi

    # Extract base filename without extension
    base_filename="${filename%.*}"

    # Check if output file already exists
    if [ -f "${base_filename}.webm" ]; then
        echo "Line $line_number: Skipping ${filename} - output file already exists" | tee -a "$LOG_FILE"
        continue
    fi

    # Validate duration format
    if ! [[ "$duration" =~ ^[0-9]+(\.[0-9]+)?$ ]]; then
        echo "Line $line_number: Invalid duration format '$duration'" | tee -a "$LOG_FILE"
        continue
    fi

    # Convert duration to HH:MM:SS.msec format
    duration_hms=$(convert_to_hms "$duration")

    echo "Line $line_number: Processing $filename with duration $duration_hms" | tee -a "$LOG_FILE"

    # Execute ffmpeg command with reduced verbosity
    if ffmpeg -hide_banner -loglevel error -loop 1 -framerate 1/20 -i "$filename" \
        -vf fps=20 -c:v libvpx-vp9 -pix_fmt yuv420p10le -deadline best -cpu-used 0 \
        -b:v 0 -crf 40 -g 60000 -ss 00:00:00.000 -t "$duration_hms" -an \
        "${base_filename}.webm" 2>> "$LOG_FILE"; then

        echo "Line $line_number: Successfully encoded $filename" | tee -a "$LOG_FILE"
        echo "$filename" >> "$PROCESSED_FILES"
    else
        echo "Line $line_number: Error encoding $filename" | tee -a "$LOG_FILE"
    fi

    sleep 1
done

# Clean up temporary file
rm "$BASE_DIR/files_to_encode.unix.txt"

echo "=== Encoding session completed at $(date) ===" >> "$LOG_FILE"
I also learned something new as my latest project was recorded from text, rather than converted from a live talk, that recording each slide’s audio text as an individual track in Audacity and then make sure the extras menu is enabled and use Extra->Scriptables II -> Get Info… and set type to Tracks and Format to Brief to get the slide timing info in start seconds/stop seconds. Use calc to subtract the per track start time from the end time to get duration.
And a practical hint, normalizing audio tracks to -3dB is a pretty standard expectation, but I find that the perceived loudness is somewhat random even if the peak of each track is -3dB. Using Effect -> Volume and Compression -> Loudness Normalization and setting perceived loudness to somewhere between -16 and -22 LUFS gives much more consistent perceived loudness (who’da’thunk?). I recommend starting at about -16 LUFS and then checking for any clipping and then decreasing by steps of -1 or -2 LUFS until there’s no clipping indicated in the waveform (indicated in red in the normal interface). This seems to result in more consistent audio tracks than normalizing to peak amplitude.
Once this finishes (and it will be a while with AV1) there will be a video file of the right number of seconds for each .png file. For my slides, the video clips are about 60-80% the size of the original png slides, because AV1 is much more efficient than .png even for still compression (like webp, based on vp9, which AV1 is the successor to).
The next step is to concatenate all the slide videos into a single video stream. First we create video list file from the folder of webm files like:
for f in *.webm; do echo "file '$f'" >> vidlist.txt; done
then we use ffmpeg again to merge the list into a single file like:
ffmpeg -hide_banner -f concat -safe 0 -i vidlist.txt -c copy slideshow.webm
what the command means:
-c copy Video streams are direct copied, no re-compression.
To verify the stream parameters you can use
ffprobe -hide_banner -select_streams v -show_entries frame=pict_type,pts_time -of csv=p=0 -i slideshow.webm | grep -v P
This should show a key frame at the cumulative seconds count (not H:M:S.MS format) for each slide change and no others (assuming there’s < 100 minutes per slide). Note this makes seeking really slow (REALLY slow) like 5 seconds to jump but to each slide is close to instant. You could use a standard value like “150” for the keyint meaning a keyframe every 15 seconds to speed up searching but at the cost of a lot of filesize.
The original png files were 9.3 MiB, the AV1 video conversion is 2.9MiB and the VP9 conversion is 3.1MiB. For a slide show, I’d argue that AV1 isn’t likely to be worth the extended encode time and compatibility issues, but YMMV and it is worth doing tests as results are very content dependent.
At this point you should have a video file without any audio and still have your .wav file plus your timing file. Next we’re going to add (back) the audio.
Adding Audio Back
This is a fairly straight forward, but we have to compress using an allowed codec for webm. I also keep the single channel and use a moderate data rate for speech.
ffmpeg -hide_banner -i slideshow.webm -i audio.wav -map 0 -map 1 -c:v copy -c:a libopus -b:a 48k -ac 1 presentation.webm
What the parameters mean:
-c:a libopus         Use libopus, an allowed audio codec in webm
-b:a 48k             Compress at 48kbps, this is quite good for speech
-ac 1                One audio track.  If you're doing stereo, then default is fine
Now you have an audio video file, synced audio and slides and should be quite compact whether in VP9 or AV1, but it can be nice to add some metainformation including subtitles and chapter headings.
Adding subtitles back.
I suggest giving the whisper produced .vtt file at least a cursory edit. It is quite good, but can have trouble with homophones, which is understandable, especially with technical jargon. Once you’re happy with the text, you can merge the subs back into the webm container, tag the audio stream and subs with languages using:
ffmpeg -hide_banner -i presentation.webm -i audio.vtt -map 0:v -map 0:a -map 1:s  \
-metadata:s:a language=eng -metadata:s:s:0 language=eng  -c copy -y preso-sub.webm
what the parameters mean:
-map 0:v                     use the video from index 0 (first input)
-map 0:a                     use the audio from index 0 (first input)
-map 1:s                     use subtitles from index 1 (second input)
-metadata:s:a language=eng   the audio is english (or pick your lang)
-metadata:s:s:0 language=eng the subs are english (or pick your lang)
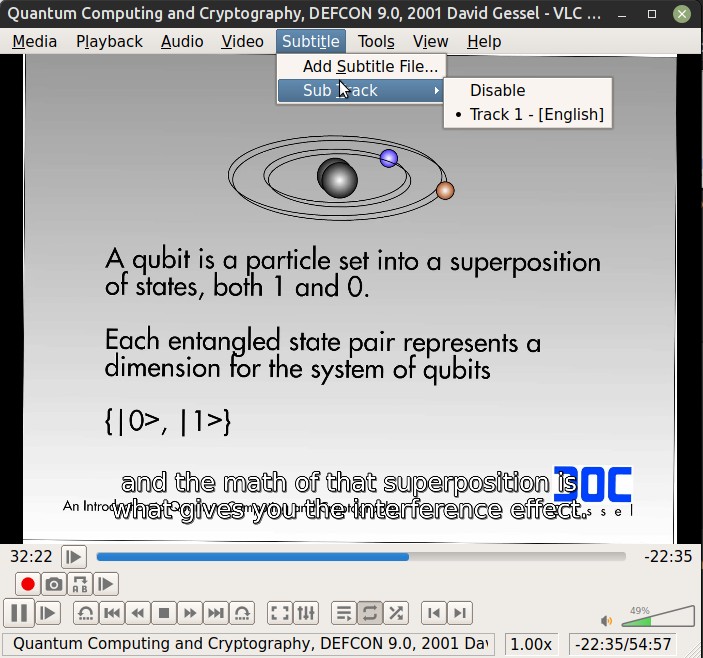
Now your video file has subtitles and these should be selectable in VLC player
Add metadata and chapters with MKVToolNix
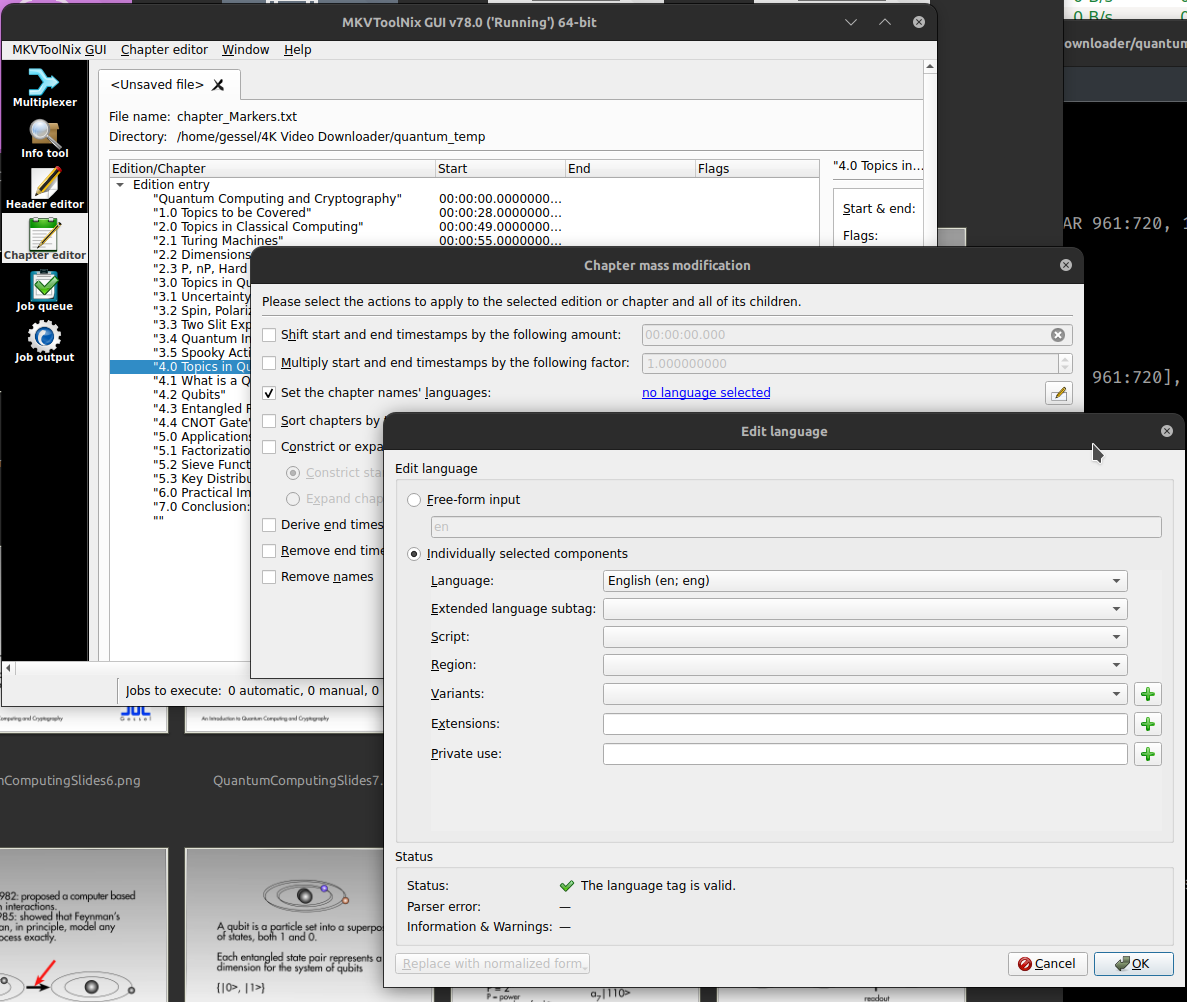
Chapter data and additional metadata is our first foray away from ffmpeg to another open source tool called MKVToolNix. Chapter data is easiest (and most reusable) by creating a chapter file using the slide timing data collected previous, but this time in absolute time in HH:MM:SS.sss so it looks like this (with the blank chapter at the out time of the whole video):
CHAPTER01=00:00:00.000
CHAPTER01NAME="Quantum Computing and Cryptography"
CHAPTER02=00:00:28.000
CHAPTER02NAME="1.0 Topics to be Covered"
...
CHAPTER22=00:50:07.000
CHAPTER22NAME="6.0 Practical Implementations"
CHAPTER23=00:51:44.000
CHAPTER23NAME="7.0 Conclusion: Gessel's Law P=2^2^(Y/2) rev: P=2^2^(Y/3.4)"
CHAPTER24=00:54:50.000
CHAPTER24NAME=""
You open this chapters.txt file in the Chapter Editor tab of MKVToolNix and then right click and select “additional modifications” then select the language. Finally, save from the “Chapter editor” menu (top of screen) and select “Save to Matroska or WebM file” and confirm that you’re going to overwrite the no-chapters version (with the addition of the chapter data).
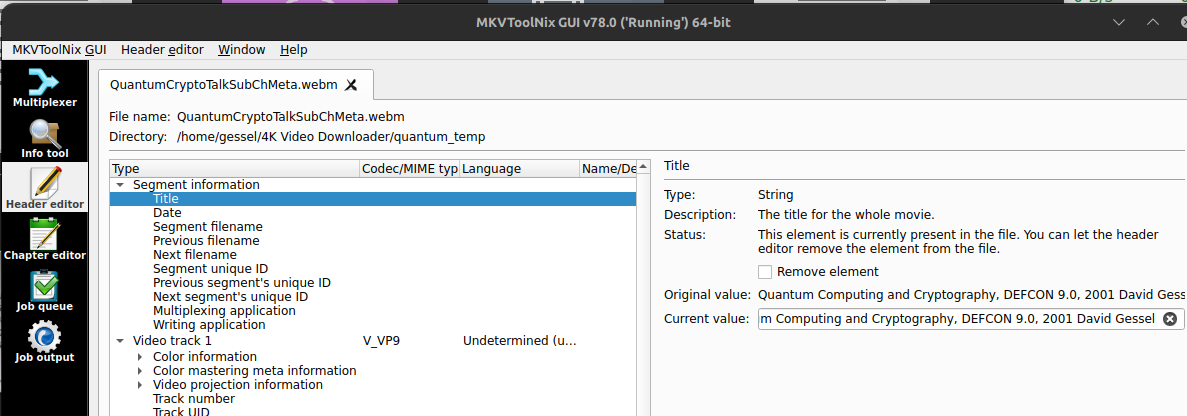
The last tidbit is to add some moderately useful metainformation, at least title and possible date (if relevant). Title, at least, is what’s used as the VLC title and possibly in other places. The MKVToolNix header editor tab will do what’s needed. You want to edit the “Segment information” – I’m not sure where the track information titles show up, so I don’t bother with them, but no harm in editing those either. Then just save with CTRL-S to update your WebM video with the additional metadata.
That’s it, you should now have a well-formatted, searchable, indexible video that will play directly from your own web server without relying on plugins or gifting your data to services like youtube or tiktok or whatever data harvesting service is luring the unwitting to data slaughter with Judas goats of convenience.

[…] that Whisper has a lot of tricks not used here. I’ve used it to add subtitles to lectures and it can do things like autotranslate one spoken language into another text language, and much […]