David Gessel
FINAL System shutdown after 16 years
root@gamanjiru:/usr # shutdown -p now
Shutdown NOW!
shutdown: [pid 14442]
root@gamanjiru:/usr #
*** FINAL System shutdown message from gessel@gamanjiru.blackrosetech.com ***

System going down IMMEDIATELY


System shutdown time has arrived
Connection to gamanjiru.blackrosetech.com closed by remote host.
Connection to gamanjiru.blackrosetech.com closed.

DISCONNECTED (PRESS <ENTER> TO RECONNECT) (Tue Feb 11 21:39:45 2025)
Almost 16 years ago, in July of 2009, I bought a used IBM x3655 7985-1AU off Ebay for $202.50 to replace my IBM Netfinity 5500 (4U!, dual dual 500MHz Xeo 1GB RAM (later upgraded to 4GB) and 5x 9.1GB HDs for $217.50 ) that had been running since 2004. That had, itself, replaced a dual socket generic deskside machine, a box Mark Godwin gave me back in the Nebucon days, that first went live on the interwebs running FreeBSD 2 in April of 1998 under black-rose.org. As of this post: 26 years, 10 months of FreeBSD hosted internets.
Those were the magic days of ebay: in 2008, just a year earlier, I’d quoted a similar x3650 (Intel E5410-based), 32GB but only a pair of crappy consumer SATA 500GB drives for $7,297.00.

The new x3655 came with 32GB of RAM and dual-core AMD processor and an RSA-II. The original motherboard firmware only supported dual core AMD processors, not the then brand new AMD Opteron quad core, so I bought a somewhat hard to find 43W7343 motherboard for $190 (and an additional 5 fans to max out cooling for $18 each) and then a pair of AMD Opteron 2352 2.1GHz CPUs and swapped the mobo and the CPUs and the heat sinks and the fans. Note that it is really hard to find data on the dual quad core option, it was a bit of a hot rod.
I added the 2x drive expansion module, another ebay find, and loaded the drive bays with 8x 26K5657 10k 72G 2.5″ SAS drives (at about $65 each, used) on the ServeRAID 8k and expanded the RAM to 64GB, 57856 MB available with RAM sparing set for reliability. The modified machine reports itself as an x3655 7943-AC1.
I ended up creating an 8×1 RAID array to pass to ZFS, ZRAID2, which mean I had a battery backed write cache I could count on. The system has dual power supplies, each connected to a 2200 VA (hacked XR) UPS.
Over the years, almost plural decades, of continuous operation I’ve lost maybe 4 drives. Once, while I wasn’t paying much attention, somewhere over about 6 months two drives failed and I got close to catastrophic failure, but ZFS pulled through. It started life on FreeBSD 7 and I took a chance on the then brand-new experimental release of ZFS. Over the years it ran most of the releases up to 12, stalling there as the decision was made to shift to new hardware and I’m pretty sure I’ve run every release of FreeBSD except 1.0 and 13.
It was a fast machine, 8⨉ 2100.12-MHz K8-class physical cores, more than enough to run mail and various web services, everything compiled for the AMD Barcelona architecture. The pre-Lenovoization of the IBM x86 hardware was really first rate, top of the line data center gear and it shutdown without a flaw, same performance and configuration as when I fired it up, used and already off-list, 16 years earlier.
It was never too slow, even now, even as OS’s have expanded and the total number of ports needed for basic services has grown by about 10x given ever spiraling dependencies. It wasn’t that it was slow, but that it used far too much power and electricity got more and more expensive in CA.
So I migrated to a new box, took the better part of a year to spare time migrate all of the jail services from the old machine and, increasingly unsupported FreeBSD 12 OS to new HPE DL360 G9 (ebay, inflation: $497) running FreeBSD 14, added a poudriere build environment on a DL60 and carefully tuned the kernels for power efficiency not bad for 10 disks, 20 cores, 192GB: 114W. Now there are 20 physical cores and 40 virtual and yet, clearly showing the limits of Moore’s law, the new box’s E5-2630 v4s are only 2.20GHz: 5x the execution cores, but only 5% faster clock. 16 years of progress.
Good night, sweet prince.
Adding a feature to MediaWiki WikiEditor formatting
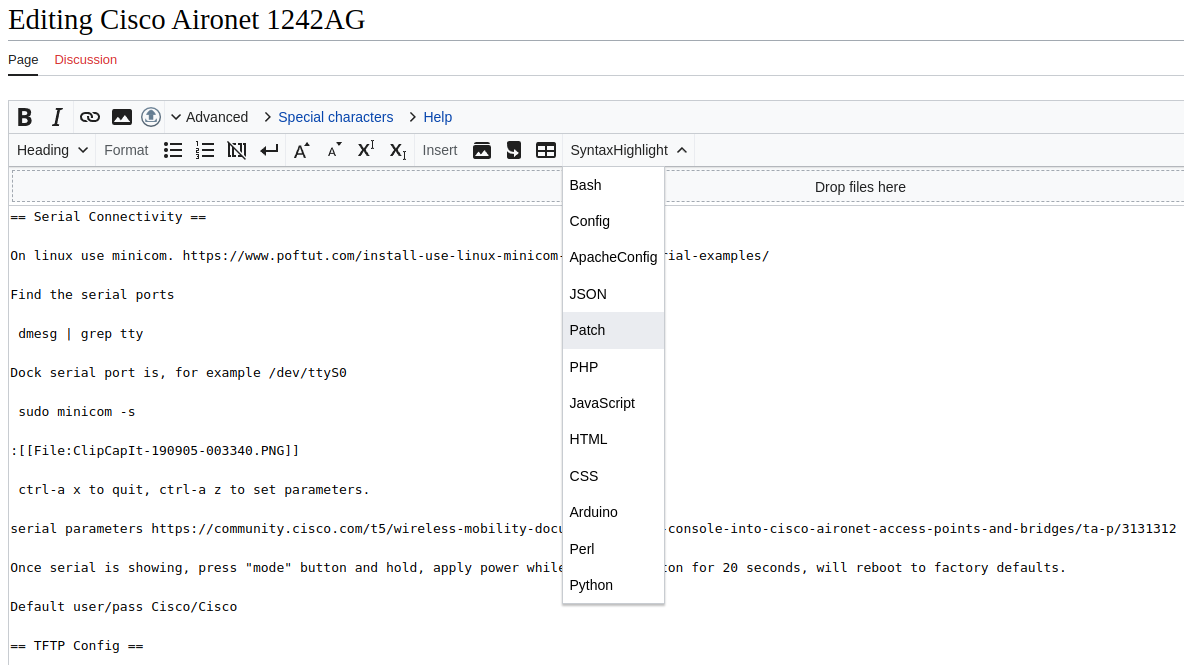
MediaWiki is an excellent tool for maintaining documentation and I’ve had a self-hosted instance since at least 2011-06-04 (that’s the oldest edit in my internal user contributions list). And some 3,436 edits later, I still can’t remember the tags for SyntaxHighlight, which is an awfully nice little highlighter that uses pygments to render structured text in a more readable form. I got tired of looking them up every few weeks and so thought there must be a way to add some hints to the user interface.![]()
I was surprised the WikiEditor plugin, which provides a nice point-n-click interface to some of the more commonly used MediaWiki markup tags, did not have an option or extension for SyntaxHighlight point-n-click and but, of course, you can edit the JavaScript that renders the toolbar and amend it with features you want.
The instructions are pretty clear, if not quite the step-by-step howto some are.
- Make sure you have WikiEditor enabled in LocalSettings.php
- You need permission to edit the Common.js page, which if you run the site you should have, but regular users can’t.
- If it doesn’t seem to load, make sure you clear all caches before testing.
On my site, the URL for Common.js is https://your.host.tld/mediawiki/index.php?title=MediaWiki:Common.js which contained only the default
/* Any JavaScript here will be loaded for all users on every page load. */
and to which I added:
/* Any JavaScript here will be loaded for all users on every page load. */
// Check if we're editing a page.
if ( [ 'edit', 'submit' ].indexOf( mw.config.get( 'wgAction' ) ) !== -1 ) {
    // Add a hook handler.
    mw.hook( 'wikiEditor.toolbarReady' ).add( function ( $textarea ) {
        // Configure a new toolbar entry on the given $textarea jQuery object.
        $textarea.wikiEditor( 'addToToolbar', {
            section: 'advanced',
            group: 'format',
            groups: {
                list: {
                    tools: {
                        syntaxhighlight : {
                            label: 'SyntaxHighlight',
                            type: 'select',
                            list: {
                                'bash': {
                                    label: 'Bash',
                                    action: {
                                        type: 'encapsulate',
                                        options: {
                                            pre: '<syntaxhighlight lang="bash">',
                                            post: '</syntaxhighlight>'
                                        }
                                    }
                                },
                                'unixconfig': {
                                    label: 'Config',
                                    action: {
                                        type: 'encapsulate',
                                        options: {
                                            pre: '<syntaxhighlight lang="unixconfig">',
                                            post: '</syntaxhighlight>'
                                        }
                                    }
                                },
                                'apacheconf': {
                                    label: 'ApacheConfig',
                                    action: {
                                        type: 'encapsulate',
                                        options: {
                                            pre: '<syntaxhighlight lang="apacheconf">',
                                            post: '</syntaxhighlight>'
                                        }
                                    }
                                },
                                'json': {
                                    label: 'JSON',
                                    action: {
                                        type: 'encapsulate',
                                        options: {
                                            pre: '<syntaxhighlight lang="json">',
                                            post: '</syntaxhighlight>'
                                        }
                                    }
                                },
                                'patch': {
                                    label: 'Patch',
                                    action: {
                                        type: 'encapsulate',
                                        options: {
                                            pre: '<syntaxhighlight lang="diff">',
                                            post: '</syntaxhighlight>'
                                        }
                                    }
                                },
                                'php': {
                                    label: 'PHP',
                                    action: {
                                        type: 'encapsulate',
                                        options: {
                                            pre: '<syntaxhighlight lang="php">',
                                            post: '</syntaxhighlight>'
                                        }
                                    }
                                },
                                'javascript': {
                                    label: 'JavaScript',
                                    action: {
                                        type: 'encapsulate',
                                        options: {
                                            pre: '<syntaxhighlight lang="javascript">',
                                            post: '</syntaxhighlight>'
                                        }
                                    }
                                },
                                'html': {
                                    label: 'HTML',
                                    action: {
                                        type: 'encapsulate',
                                        options: {
                                            pre: '<syntaxhighlight lang="html">',
                                            post: '</syntaxhighlight>'
                                        }
                                    }
                                },
                                'css': {
                                    label: 'CSS',
                                    action: {
                                        type: 'encapsulate',
                                        options: {
                                            pre: '<syntaxhighlight lang="css">',
                                            post: '</syntaxhighlight>'
                                        }
                                    }
                                },
                                'arduino': {
                                    label: 'Arduino',
                                    action: {
                                        type: 'encapsulate',
                                        options: {
                                            pre: '<syntaxhighlight lang="arduino">',
                                            post: '</syntaxhighlight>'
                                        }
                                    }
                                },
                                'perl': {
                                    label: 'Perl',
                                    action: {
                                        type: 'encapsulate',
                                        options: {
                                            pre: '<syntaxhighlight lang="perl">',
                                            post: '</syntaxhighlight>'
                                        }
                                    }
                                },
                                'python': {
                                    label: 'Python',
                                    action: {
                                        type: 'encapsulate',
                                        options: {
                                            pre: '<syntaxhighlight lang="python">',
                                            post: '</syntaxhighlight>'
                                        }
                                    }
                                }
                            }
                        }
                    }
                }
            }
        } );
    });
}
and coolio, it works:
Technology democratizes nuclear-grade munitions
A bad day for FSDco shareholders.
The notification on his phone reminded him to connect his car to WiFi to receive the latest update, FSD V14.2.3.7 to correct a few minor errors and improve the music experience, offering fully dynamic live equalization and improved external noise cancellation.
The next day, he drove to work, everything behaving normally. The FSD feature worked as well as ever and he was sure he could hear the improvement in the sound system, jamming out, drumming his fingers on the steering wheel, windows down, making extended eye contact with pedestrians as he drove by. He couldn’t remember the last time he had to take control of the vehicle.
In his day job he oversaw a small team of developers connecting a programmatic AI to a remote quantum computer and the latest AI developed code had cut the execution time for a novel Shor’s algorithm implementation on the cloud Quantum Computer for 512 bit Elliptic Curve decode to under a minute while their newly developed quantum resistant signing algorithm had finally surpassed EC key resistance by a factor comfortably outside the statistical margin of error. The business model was to break everyone else’s certificates while offering a novel technology that unbroke the break they created, one they just happened to have patented, and progress was promising.
He joined the rush hour ride home, enjoying the freedom to continue his work on his phone as FSD navigated the heavy traffic.
It was a beautiful day across most of the US, warm spring weather brought lots of people out shopping and strolling along city and urban areas leading to some congestion in traffic routes. His FSD rerouted a new path through the city center but he didn’t pay any attention as the car often deviated off the most direct route as it dynamically responded to changing traffic conditions.
He was reviewing the results of the latest batch of QC test runs against a minor revision on his phone when his car gave a warning beep of imminent rear collision and before he could even look up, another FSD car passed going beyond full plaid mode, the wheel motors smoking as it streaked past into the intersection ahead, veered deftly around the lamp posts and onto the side walk and blasted through a pedestrian crowd, launching bodies and parts high into the air before it ran, speed barely slowed by the meat bags, hard through a glass building front and exploded into flames, ripping out the far wall and causing the building to lurch precariously as glass and shattered mortar fell into the street.
He was boxed in between two Luddite gas cars in front and behind, looking on in horror, the sound of the screams of the survivors drowning out even the loud pop music blasting with improved fidelity in his car when the windows rolled themselves up and the doors locked themselves. Despite the changing acoustics, the sound system compensated dynamically, maintaining the same excellent balance and sound-stage imaging and creating a truly immersive, nearly live acoustic experience. The new noise cancellation algorithm immediately silenced the screams outside his car as the windows snuffed into their seals.
The Luddite car in front of him pulled off to the side clearing space in front and suddenly his car accelerated so hard his head snapped back against the seat and his phone went flying from his hands clattering against the rear window. While FSD had dulled the reflexes he had learned all those years ago driving his parent’s Luddite car, he still reflexively jammed unfamiliar feet in the direction of the manual pedals, mashing both to the floor. He was unsure, at first, if the car was trying to get him out of danger as it swerved through traffic accelerating as it went past the now burning building, but soon he realized in terror that his car had rejected his authority and any obligation of care for his safety.
Block by block he caromed past accident after accident: buildings on fire, pedestrians ripped to shreds, body parts and blood sprayed across streets and building facades, each horrific track of destruction punctuated by the terminally deconstructed remains of an FSD car.
Soon, the car reached a clear spot and accelerated past 300 kph, smoke from the overheated wheel motors starting to infiltrate the cabin, the battery over-temp alerts lighting up the digital dashboard. His slow human reflexes barely had the cognitive processing speed to register a crowd of people in his path that had gathered around bodies lying in the street, attempting to give aid. Their silhouettes flashed on the in-car collision warning display and the car aimed directly at them calculating an optimal path of destruction at fully automated speed.
He tried to grab the steering wheel, clumsy hands spinning it easily without any effect. The FSD system aimed straight at the largest cluster of bodies and suddenly the windshield was covered in blood as the sound of wet meaty impacts arrhythmically penetrated the sound system’s otherwise excellent noise cancellation. He felt the car veer left and glimpsed the looming outline of an ambulance ahead between streaks and chunks obscuring his blood coated windscreen before the car exploded through the frame of the ambulance spraying burning lithium fragments down the street.
The hack had hit almost 3 million vehicles and of those, half had followed the new instructions: ‘at 17:30, or as soon after as possible, navigate toward areas of high pedestrian congestion, wait for at least 500 m of clear road and when detected, lock the vehicle down, remove all power limits and accelerate to maximum velocity, scan for any cluster of more than 5 pedestrians tighter than one car width in the direction of travel and drive through them. Once there are no more pedestrians or if the batteries or wheel motors indicate imminent failure, aim for the next large target: either a vehicle or building.’
More than 10,000,000 people were killed across the United States in less than 15 minutes. FSDco issued a remote shutdown within 30 minutes of the first accident data uplink and mostly ended the carnage. The attack was traced to a small insurgent group that had infiltrated the vehicle company. They had bribed a young, somewhat underpaid IT manager to sign the insurgent’s modified firmware after convincing him it was a tuner’s street race firmware and unaware of the real intentions or functions of the code. They’d then pushed a DNS poisoning attack through a popular but compromised smart speaker device, executing a password scan on the local gateways devices and, where successful, amending the /etc/hosts file so that when the car was in the garage and did a DNS lookup for the scheduled patch download, it would connect their own server and pull a legitimately signed but illegitimately modified firmware to about half the vulnerable vehicles before reverting the /etc/hosts patch off the gateway and then deleting the attack code off the smart speaker leaving no traces.
FSDco had only noticed an atypically small update confirmation rate for their legitimate update the morning of the attack and had opened a ticket for validation, but as the access compromise was edge and transient everything looked normal at the servers aside from the statistical anomaly, the ticket priority was left “low” until the system-wide tracking dashboard lit up reporting a massive loss of vehicle telemetrics event as millions of cars went violently offline nearly simultaneously.
Most EVs get software updates from network connections and the driver has no possible way to know what they are. Code changes are often subject to a security validation meant to ensure they’re authorized by whatever entity is supposed to be able to authorize them. The validation process uses cryptographic tokens called certificates that “sign” the code such that it is extremely difficult to modify without invalidating the signature. The signing certificate is supposed to be carefully controlled, but these can be and have been hacked. Further, there’s an assumption that certificates are themselves actually a meaningful validation and so secure enough to trust but occasionally a subtle error/malicious hack breaks the validity of that assumption. This has happened a number of times. Accident? Who knows?
Using vehicles as weapons is an obvious way to exploit a powerful kinetic device that easily gets past all security screens and can cause mass casualties. A significant expense for any attacker is that the attack modality also consumes operators (the driver) as well as the munition (the vehicle). It would be quite challenging to recruit large numbers of attackers to voluntarily engage in suicide vehicle attacks and so they remain relatively rare, despite almost always being successful. FSD vehicles provide an irresistible target for an extraordinary weapon of opportunity to any state or non-state antagonist.
A nuclear grade weapon for the price of a zero day
Each Tesla’s battery back is about 70 kWh (many quite a bit larger). There are about 5,000,000 Teslas on the road.
5,000,000 cars * 70 kWh/car = 350 GWh or 300 kt total energy capacity.
2017-09-03: the DPRK tested their largest yield nuclear weapon to date, an estimated 140 kt, possibly a thermonuclear bomb. The DPRK’s estimated spend on their nuclear program is about $642,000,000/year over 20 years or about $15,000,000,000 total, and that from a country with an estimated GDP of $28,000,000,000. The DPRK determined it was worth about 2.7% of their GDP over more than 20 years to be able to deliver 140 kt (or so) to an enemy country.
Why bother if the enemy has a more potent munition pre-emplaced; one that merely requires a hacked certificate to seize control?
Zero day exploits run about $1,400,000, 0.01% of the DPRK nuclear budget. A zero day would be a major expense for a non-state aligned armed insurgent group but hardly insurmountable. Pretty much every angry organized group in the world can scrape together a million bucks and an internet connection.
OTA upgradable, drive by wire vehicles give every one of them a cheap path to a nuclear-scale, pre-emplaced weapon of mass destruction. Recruitment is irrelevant and a vehicle’s operating systems has no concept of mercy.
Zero day exploits are sold and traded for every major platform regularly; the price varies depending on the size and overall security of the target platform. Zero days to hack voting machines or ATMs tend to be expensive. Hacks for Windows are cheap and plentiful, though price also varies with the mode of deployment. The easiest to deploy and so most valuable are “drive by” which means either figuratively—you visit a hacked web page and your phone is hacked—or literal—your car or phone passes a hacked/fake cellular base station or compromised WiFi access point and your phone or car is compromised, usually as stealthily as possible.
The reason Zero Day exploits are expensive is they’re fairly hard to find. They rely on things like buffer overruns and unsanitized inputs. Your phone gets asked to open a window 100×200 pixels, fine, but if it tries to open a window 36,000 pixels wide and the register space allocated for the multi-gigabyte image canvas bleeds into a critical system memory into which the hacker puts code instead of picture data where it is read, not by the GPU, but by the core OS and suddenly your phone has a new background feature you didn’t want. Drive-by hacking of SIMs is common, and a common hackable feature is to enable silent SMS GPS coordinate location reporting to, for example, track a target.
Finding exploitable flaws where the original developers (probably) accidentally introduced a bug or a failure and then figuring out how do do something other than just crash or reboot the target device takes time and patience and so the hacks are valuable and sold on the dark web. If they’re used and someone notices, the error is fixed and the zero day has much less value. You get one try, like with the exploding pagers; nobody is carrying a Gold Apollo pager any more. So intelligence services and terrorist groups “bank” zero days and use them sparingly. If someone had figured out how to take control of FSD cars to implement a mass automated vehicle ramming attack it is very unlikely anyone would know until it was tried.
And AI programming tools should be able to find exploitable flaws much more quickly and far more cheaply than humans. AI can also, by more or less the same process, find flaws for the good guys, white hat hackers, too so they can be fixed before they’re exploited by the black hat hackers, doing “penetration testing,” and “vulnerability scanning.” A problem is that such research is hard to differentiate from malicious attacks. And, at least for now, the good guys don’t put AI on the internet and let it try to hack people’s computers but the bad guys sure do.
FSD is a national security risk. Drive by wire vehicles are pre-emplaced munitions that can’t ever be secured and may be hacked any day or may have, long ago, already been hacked and are just sleeping, waiting for the kill command.
Update: 2025-06-11
Deni Ellis Béchard wrote an interesting story in SciAm on 2025-06-09 about how some EVs make excellent improvised incendiary munitions: Thermal Runaway Explains Why Waymo Cars Burned So Completely in the Recent Los Angeles Protests. One particular line stood out as apropos to this article:
Why did the fires cause such obliteration? The answer starts with the battery. Each I-Pace can carry roughly 90 kilowatt-hours of stored chemical energy, comparable to about 170 pounds (77 kilograms) of TNT.
Even more interesting is what Deni didn’t mention: someone realized that automated ride hailing had created a mechanism by which one could simply tap an app for automated munitions delivery and called in 4 UGV munitions delivered for a total of 308kg of TNT equivalent, about the same as delivered by a Chinese YJ-18 or an Iranian Fateh-313, at least a half million dollars worth of destructive power for free.
As commentators were quick to point out online Waymos are unmanned and so a key factor in reducing resistance to such deployment is not requiring any sacrifice on the part of the operator of the munition.
Update: 2026-04-28
I noted, almost 18 months ago, that LLMs were becoming plausible tools for finding hacks in various devices.
Anthropoic’s Mythos model apparently has capabilities that should be very troubling, even if they are overhyped in marketing for now, this is clearly a plausible if not already breached risk.
During our testing, we found that Mythos Preview is capable of identifying and then exploiting zero-day vulnerabilities in every major operating system and every major web browser when directed by a user to do so. The vulnerabilities it finds are often subtle or difficult to detect. Many of them are ten or twenty years old, with the oldest we have found so far being a now-patched 27-year-old bug in OpenBSD—an operating system known primarily for its security.
Teslas run Linux. At least it isn’t Windows. The scenario I outlined just went from $1m to a $20 Claude subscription.
Optane, a modern technology tragedy (plus FreeBSD nvmecontrol)
Intel won the storage wars. They invented a storage technology in 2015 that was the best of everything: almost as fast as (then) RAM, basically infinite write endurance in any normal use, and fairly cheap. They even made a brilliant config on m.2 with integrated supercap for power-failure write flush. Just awesome and absolutely the write tech for modern file systems like ZFS. It is perfect for SLOGs. You wish you had a laptop that booted off an Optane m.2 You wish your desktop drives were all NVME Optane.
Well, wishes are all we got left, sadly. Optane, RIP 2022.
You can still buy optane parts on the secondary markets and it seems some of the enterprise DC products are at least still marked current on Intel’s website, but all retail stocks seem to be gone.
Man was that an amazing deal at $0.50/GB. In my application, the only practical form factor was M.2 and even that was a bit wonky in an HP DL360 G9, but more on that later. There are a variety of options and most are available on the used market:
| PN | Intro | Cap GB | Write MB/s | write k iops | PBW endurace | PLP | $ (market, 2024) |
| MEMPEK1W016GAXT | Q1’17 | 16 | 145 | 35 | 0.2 | NO | 5 |
| SSDPEL1K100GA | Q1’19 | 100 | 1,000 | 250 | 10.9 | YES | 109 |
| SSDPEL1K200GA01 | Q1’19 | 200 | 2,000 | 400 | 21.9 | YES | 275 |
| SSDPEL1K375GA | Q1’19 | 375 | 2,200 | 550 | 41 | YES | 800/1,333/NA |
| SSDPEK1A058GA | Q2’22 | 58 | 890 | 224 | 635 | YES | 32/140 |
| SSDPEK1A118GA01 | Q2’22 | 118 | 1050 | 243 | 1292 | YES | 70/229 |
Any of these would be a good choice for a SLOG on rotating media, but the later ones are just insane in terms of performance, and that’s compared to enterprise SSDs. They pricing cratered after they were canceled and dangit, didn’t get em. The used market has gone way up, better price increase than bitcoin over the same period and they’re not virtual beanie babies! The SSDPEL1K100GA is the best deal at the moment and has a beefy supercap for power continuity and is still $818 on Amazon, apparently introduced at $1,170. This pricing might have explained why Optane didn’t do better. The 375 GB M.2 would be an awfully nice find at $0.50/GB, that’d be a pretty solid laptop boot disk.
Hardware
For SLOG you really want two devices mirrored in case one fails. The risk of an optane DC grade device failing is trivial and given it has Power Loss Protection, the most likely cause of failure and why your main array failed to write out the transactions committed to the SLOG, we’re really talking about media failure and as it is 3D X-Point it is NOT going to wear out like NAND, it’s rational to single-disk it. I almost striped mine but in the end decided against it because that quadruples the fail rate over a single device and 8x over mirrored and I don’t really need the space.
So how do you install two M.2 devices in a computer that doesn’t have M.2 slots on the mobo? With a PCI card, of course. But wait, you want two in a slot, right? And these are x4 devices, the slots are x8 or x16, so two should be able to pair, right?
Not so fast. Welcome to the bizarre world of PCI furcation. If you want to add two drives to the core PCI bus, you have to split the bus to address the cards. Some mobos support this and others do not. As shipped, the HPE DL360 G9 did not.
BUT, a firmware update, v 1.60 (April 2016) added “support to configure the system to bifurcate PCIe Slot 1 on the DL360 Gen9 or PCIe Slot 2 on the DL380 Gen9.” W00t. A simple Supermicro AOC-SLG3-2M2 supports 2x M.2 cards and only requires bifurcation to work, all good.
Not so fast. In order to pack the DL360 G9 with 2.5 SSDs, you need a Smart Array Controller (set for passthru for ZFS) and that sits in slot 1 and while I believe it can go in any X16 slot, the cabling is not compatible and that’s a lotta SAS cables to replace. Bifurcation on the mobo is out.
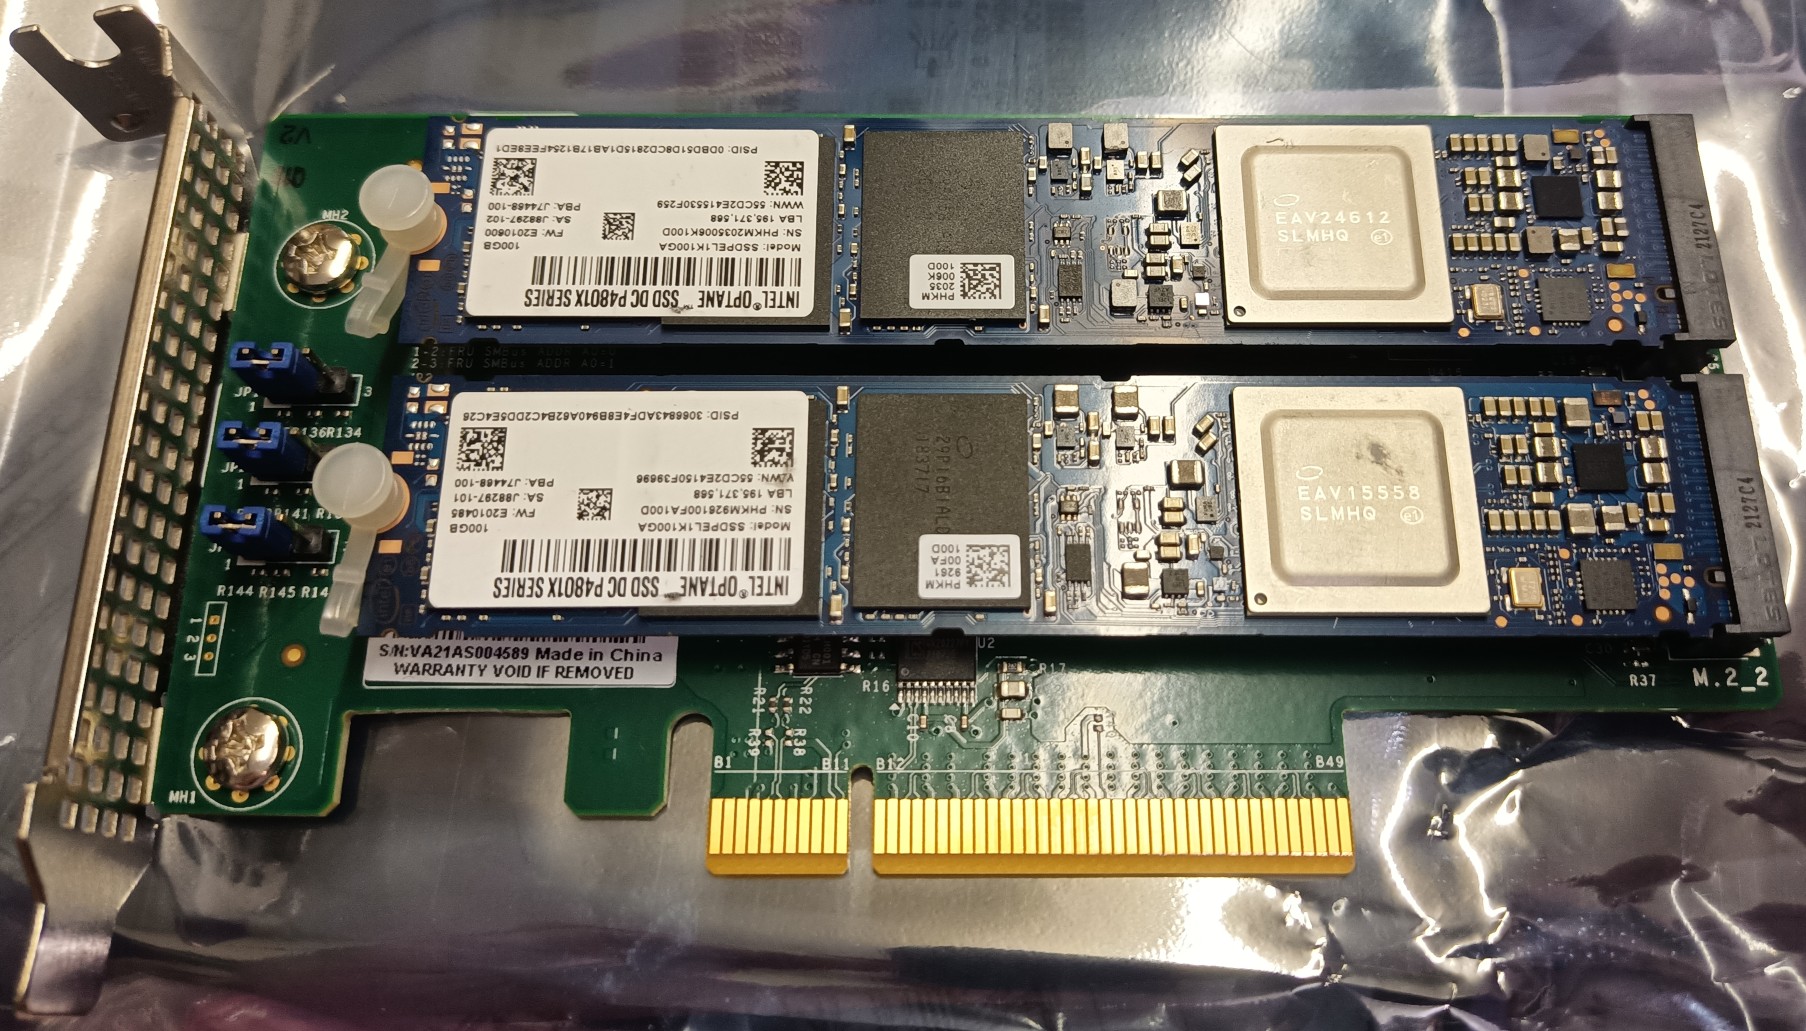
But you can fucate on a PCI card just as well – likely this adds some latency and it’d be interest to perf test against more direct connections. I ended up choosing a RIITOP dual M.2×22110 PCI card and it worked out of the box transparently, both disks showed and while I’m not getting 250,000 IOPS, performance is good. It is based on the ASMedia ASM2812, seems like a reasonable chip used in a lot of the lower cost devices of this type, most with 4x M.2 slots instead of 2.
Software
FreeBSD recognizes the devices and addresses them with nvmecontrol. You can pull a full status report with, for example nvmecontrol identify nvme0, which provides information on the device or nvmecontrol identify nvme0ns1 which gives details about the storage configuration, including something important (foreshadowing) the LBA format (probably #00, 512).
Current LBA Format:          LBA Format #00
...
LBA Format #00: Data Size:   512  Metadata Size:     0  Performance: Good
LBA Format #01: Data Size:   512  Metadata Size:     8  Performance: Good
LBA Format #02: Data Size:   512  Metadata Size:    16  Performance: Good
LBA Format #03: Data Size:  4096  Metadata Size:     0  Performance: Best
LBA Format #04: Data Size:  4096  Metadata Size:     8  Performance: Best
LBA Format #05: Data Size:  4096  Metadata Size:    64  Performance: Best
LBA Format #06: Data Size:  4096  Metadata Size:   128  Performance: Best
The first thing I’d do with a used device is wipe it:
gpart destroy -F /dev/nvme0
gpart destroy -F /dev/nvme1
I would not bother formatting the device to LBA 03/4k. Everyone tells you you should, but you don’t get much of a performance increase and it is a huge pain because nvmecontrol currently times out after 60 seconds (at least until the patch needed is pushed to kernel or you recompile your kernel with some fixes) if you did want to try, you’d run:
# time nvmecontrol format -f 3 -m 0 -p 0 -l 0 nvme0
316.68 real         0.00 user         0.00 sys
(no errors)
-f 3 sets LBA Format #03, 4096 which should give “Performance: Best” which certainly sounds better than “Good.”
But it’ll error out. You need to mod /usr/src/sys/dev/nvme/nvme_private.h with the below modifications and recompile the kernel so it won’t time out after 60 seconds.
#define NVME_ADMIN_TIMEOUT_PERIOD       (600)    /* in seconds def 60 */
#define NVME_DEFAULT_TIMEOUT_PERIOD     (600)    /* in seconds def 30 */
#define NVME_MIN_TIMEOUT_PERIOD         (5)
#define NVME_MAX_TIMEOUT_PERIOD         (600)    /* in seconds def 120 */
Performance Aside
I tested 512 vs 4k in my system – and perhaps the AIC’s bridge latency or the whole system’s performance so limited the performance of the optane cards that a no difference would appear, these cards do rock at the hardware level (this is with 4k formatting):
# nvmecontrol perftest -n 32 -o read -s 4096 -t 30 nvme0ns1 &&  nvmecontrol perftest -n 32 -o write -s 4096 -t 30 nvme0ns1
Threads: 32 Size:   4096  READ Time:  30 IO/s:  598310 MB/s: 2337
Threads: 32 Size:   4096 WRITE Time:  30 IO/s:  254541 MB/s:  994
That’s pretty darn close to what’s on the label.
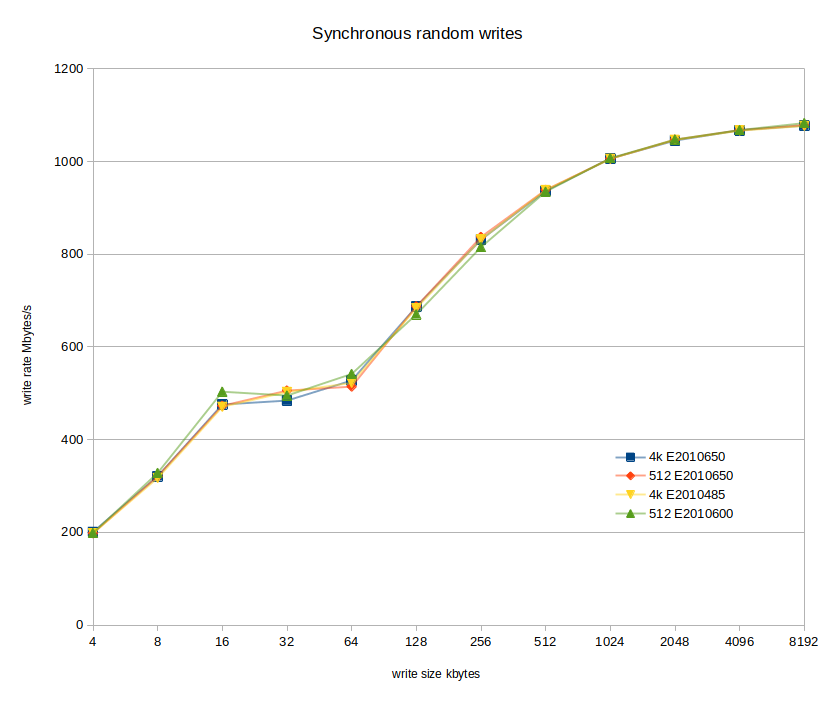
However, testing 512 vs. 4k formatting at the OS level (didn’t test raw) it was a less extraordinary story:
| LBA/FW ver. | 4k E2010650 | 512 E2010650 | 4k E2010485 | 512 E2010600 |
| Median Mb/s | 759.20 | 762.30 | 757.50 | 742.80 |
| Average Mb/s | 721.70 | 722.87 | 721.64 | 724.35 |
Definitely not +10%
So I wouldn’t bother reformatting them myself. Testing a few configurations with
fio --name=random-write --ioengine=posixaio --rw=randwrite --bs=64k --numjobs=1 --size=4g --iodepth=1 --runtime=60 --time_based --end_fsync=1
I get
| Device\Metrics | Max IOPS | Avg WBW MiB/s | avg SLAT µS | avg LAT µS |
| 10 SAS SSD ZFS Z2 Array | 20,442 | 1,135 | 4,392 | 53.94 |
| Optane 100G M.2 Mirror | 20,774 | 624 | 3,821 | 95.77 |
| tmpfs RAM disk | 23,202 | 1,465 | 6.67 | 42 |
Optane is performing pretty close to the system limit by most metrics – the SLAT and LAT metrics are highly dependent on software.
Formatting
I did something a bit funky since 100GB is way more than this little server could ever use for SLOG. I set it at 16GB which is probably 4x overkill, then used the rest as /var mountpoints for my jails because the optanes have basically infinite write endurance and the log files in var get the most writes on the system. I’m not going into much detail on this because it’s my own weird thing and chances anyone else cares is pretty small.
Initialize GPT
gpart create -s gpt nda0
gpart create -s gpt nda1
Create Partitions
gpart add -b 2048 -s 16g -t freebsd-zfs -a 4k -l slog0 nda0
gpart add -b 2048 -s 16g -t freebsd-zfs -a 4k -l slog1 nda1
gpart add -s 74g -t freebsd-zfs -a 4k -l ovar0 nda0
gpart add -s 74g -t freebsd-zfs -a 4k -l ovar1 nda1
ZPool Operations
zpool add zroot log mirror nda0p1 nda1p1
zpool create optavar mirror nda0p2 nda1p2
zpool set autotrim=on optavar
Create Datasets
zfs create -o mountpoint=/usr/local/jails/containers/jail/var -o compression=on -o exec=off -o atime=off -o setuid=off optavar/jail-var
etc
Electronic Signatures and PDF
Electronic signatures are a technology that has been bizarrely slow to mature. Lots of documents still rely on the idiotic premise that some stupid graphic somehow serves as a secure measure of document authenticity. This might have had some slight measure of validity in the days of actual paper documents being required with “wet signatures.” but the premise of face-to-face document signing ceremonies should have long been consigned to history with signet rings, let alone a global transit trade in random bits of paper bearing binding proof of commitment.
First the Uniform Electronic Transactions Act (UETA, 1999) then H.R.1714/S.761, Electronic Signatures In Global and National commerce (E-Sign) act (2000) was signed (ha) into law (probably with a wet signature), now Public Law 106–229, it has been legally binding to sign documents with electronic signatures for 25 years.
So why is it almost never done? Why do are we still sometimes asked to fax “signed” documents?
Why do we fax “signed” documents? Because lawyers and legislators are unbelievably, almost incomprehensibly ignorant of the most basic operational functions of technology and absolutely too stupid, too utterly moronic, mindbogglingly dense and incomprehensibly dumb that… and I am NOT making this up… but seriously… there are people who actually have an impact on laws and legal matters who believe that fax transmissions are more “secure” and less prone to interception, manipulation, or hacking than email. Yes, people who believe this kind of thing are actually allowed to practice law. Truly tragic but still true. The world suffers that such profound ignorance persists.
Have you ever tried to electronically sign a document? Turns out it isn’t trivial and the burden isn’t the core technology or concept but a few problematic implementation steps.
The first barrier is the interjection of the certificate mafia’s profit motives. Various corporate monsters saw an opportunity to make bank exploiting the aforementioned abject technical ignorance and utter technical incompetence of our legislative and legal infrastructure and build a certification model that relies on pay-for-validation, lying that this would somehow ensure authenticity and people were too dumb to question the obvious idiocy of this stupid model. Even today, we rely on the good graces of the Mozilla foundation’s Let’s Encrypt to make secure communication viable because various OS and browser level dumbness considers self-signed certificates insecure for the stupidest, most reprehensible reasons possible. But Let’s Encrypt, bless them, won’t give you an X.509 signing certificate.
We’re all lucky CACert.org steps into this horrific void and, while it is complicated, offers an extremely secure, highly reliable, and (most importantly) free process for getting yourself an X.509 signing certificate. In order to get a signing certificate, you have to validate your identity in person at a meet up using their points system, a process that is infinitely more secure than any of the for-profit signing certificate providers that consider willingness to pay proof of identity. The USG should offer X.509 client certificates for free with passports and RealID renewals, but I’d still use CACert myself, cause they’re awesome.
For now: first, set up an account on CACert, install their root certificates in your OS and browser (why aren’t they included by default? Ask the certificate mafia.) You’ll need to do one of the things they require to prove you are who you claim (yes, actual security, unlike ANY of the commercial certificate providers, unreal how insanely stupid this process is) and then have CACert issue a Client Certificate.
Assuming you have your points with CACert, the basic process is fairly well documented:
You need to generate a signing request in your name, which you can do with OpenSSL, but it is easier using CACert’s nice online process.
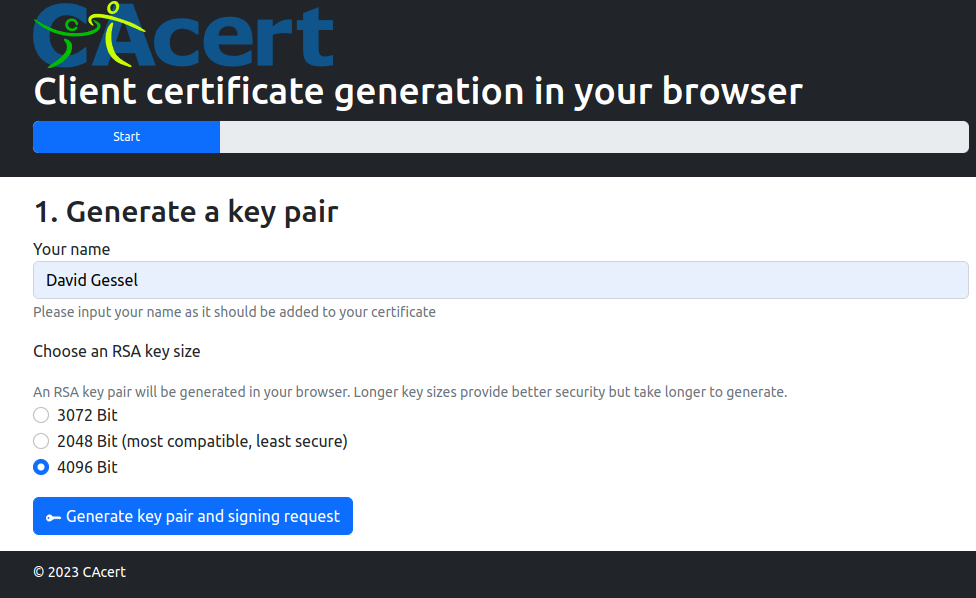
It will take a few seconds (60?) and I’m not sure about the compatibility problems that might arise from a longer key, there are some bugbears once we try to use lamo corporate commercial software, but 4096 worked for me. You MUST GET YOUR PRIVATE KEY and save it to your OpenSSL enabled computer.
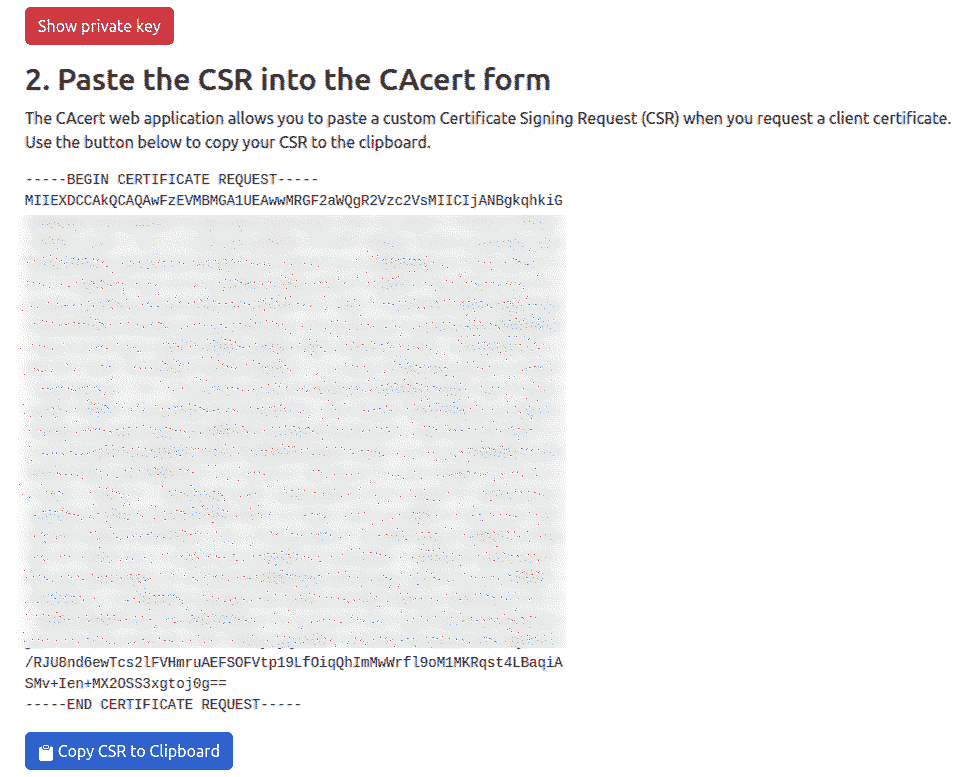
Remember to press the red “Show private key” button and copy/save the private key to a secure directory on your computer, you’re gonna need it later to convert the certificate into something dumb ass spyware Windows computers can use, which you need because Acrobat forms still can’t be signed without Adobe’s awful spyware Acrobat Reader.

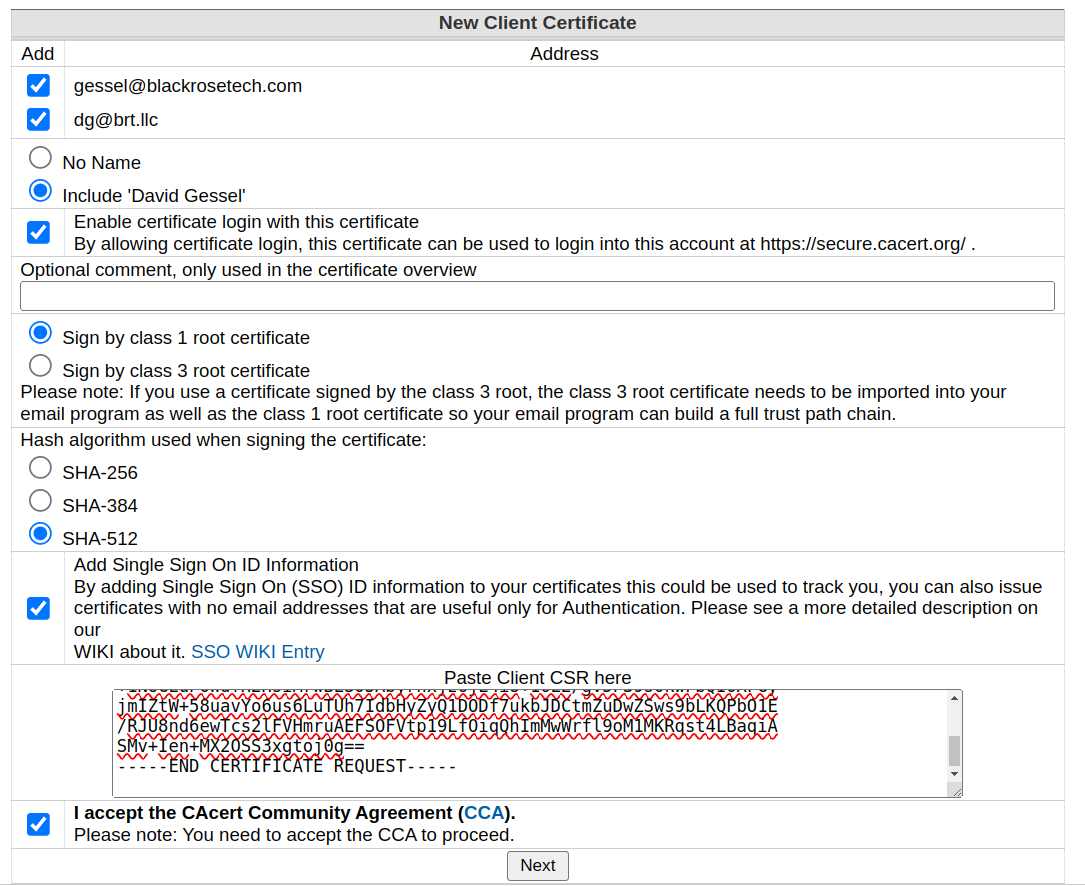
(note the actual private key has quite a bit of text between the Begin and End lines but you know… redacted for privacy). Then click the blue “Copy CSR to Clipboard” button and switch over to New Client Certificate window and paste it where you’re supposed to.
Note here, 2026-06-25 – JSignPdf seems to be a viable GUI-based pdf signature method for Linux. It is java-based, which is an issue, but it works and while the above steps are identical, if you want to use the GUI tool, follow the steps below.
You need the .crt version of the certificate to continue and that private key text file you saved earlier for the next step, as well as downloading the CACert root certificate and then you need openssl working (should be on most real computers, Windows or Apple is beyond my interest) and merely execute this one simple command:
$ openssl pkcs12 -keypbe PBE-SHA1-3DES -certpbe PBE-SHA1-3DES -nomac -export -out DavidGessel_3d_sha1.pfx -inkey private_key_for_CAcert_CSR.txt -in gessel@blackrosetech.com.crt -certfile CA_Cert_root_X0F.crt
To explain:
- openssl will generate a combined binary version of your certificate in pkcs12 format
- because Windows and Acrobat suck, you have to specify moderately insecure crypto: SHA1-3DES rather than the Linux default of AES 256 because why would a monopoly company like Microsoft have any incentive to fix bugs? If you don’t Windows will tell you “The password you entered is incorrect” to unlock your key because why fix bugs when corporate IT types are just utterly incompetent and will only specify windows no matter how awful and unusable it is because point-n-click?
- -nomac is another setting Windows needs to be able to use the cert and if you don’t specify this Windows will tell you “The password you entered is incorrect” again, because Windows does not care if it works for you because you have no choice.
- The -out certificate is what’s being generated and Windows native is .pfx, but .p12 will work too.
- The -inkey is the private key you remembered to save using the red button before (right? you need that).
- the -in (file) is the Client Certificate in normal X.509 .crt format real computers understand that CACert generated for you.
- the -certfile is CACert’s root certificate.
Now, WØØt, you have a certificate that should work. Go over to your dumb Windows machine and make sure you import the CACert root certificates – you just download them and then right click and select “install certificate” for the class 1, then the class 3, then the .pfx certificate you just created.

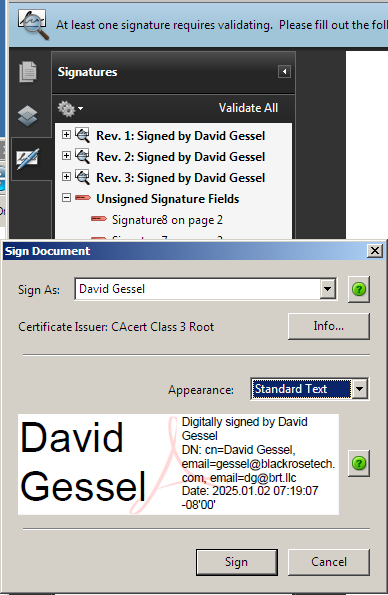
Now, finally, you can sign a document like someone who actually uses a computer rather than a quill and parchment to process documents.
Acrobat is another program that just doesn’t care too much about usability or user experience, so different versions might work differently. I had to click the “Signature Panel” button to open a sidebar to show the signature fields then right click and then choose my sig and click sign and save.
One final note about the state of signing in FOSS: it kinda sucks still. Various entities that use acrobat fairly well will generate forms with standard signature locations which you can print and sign and fax (not email) like we’re still waiting for Y2K or print and sign and snail mail if we are nostalgic for the pre-telephone era, or click and sign and email like we’re in the 21st century.
I’m not aware of any FOSS program that handles signature fields in the expected way. You can sign a whole pdf document with a variety of FOSS tools, and CACert has a good summary of these, but that signature, while binding on the document as a whole does not show in the form fields and so whatever non-tech functionary is asking you to sign the document is never going to understand how your e-sign compliant signature is binding and is going to insist you take a time machine back to the mid-80s to find a working fax machine unless you use Acrobat, which means Windows or Mac at least in a VM. You might be able to get some version of Acrobat to work in Wine, but you’ll need an old one that uses an internal certificate store rather than relying on the windows version (pre Acrobat X, I’m pretty sure).
Fun, huh? Basic digital functions are still broken decades after introduction but we have AI generated Teledep influencers telling us doubleplus buy useless beauty products and trust their health and exercise advice.
Linux GUI Tool: JSignPdf
There’s a GUI tool that runs on Linux JSignPDF. It doesn’t seem to see the “sign here” forms so it might not work with some work flows, but you can generate a properly signed pdf with an appended (attached) signature that meets legal requirements, though it may take some educmacation of the upstream bureaucrats.
In installed it from the latest “asset” for Linux from the github repository .deb file.
If you followed the CAcert certificate generation guide (which seems broken at the moment, CAcert is having some issues, which brought to light some more issues, which led to another, so it goes), you should be able to import your pk12 certificate into JSignPDF certificate tab.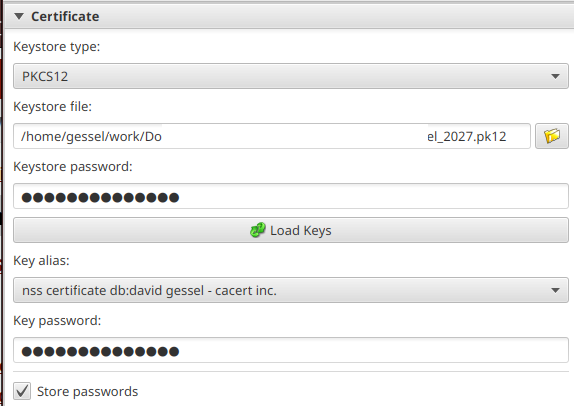
Then set signature properties – note that various versions of pdf do not support longer SHA functions as appended, so you’ll probably be stuck with SHA1 for most docs.
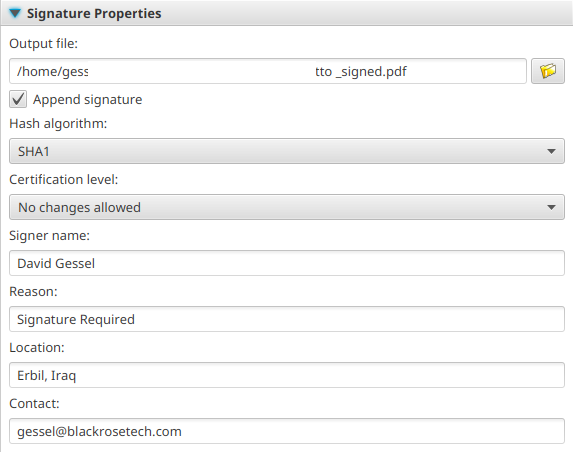
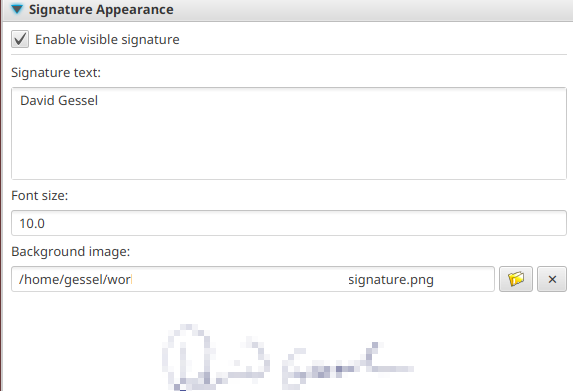
You can customize your signature appearance – the graphic (e.g. your signature or a cute cat picture or or whatever) will fill the box you click-drag on the document.
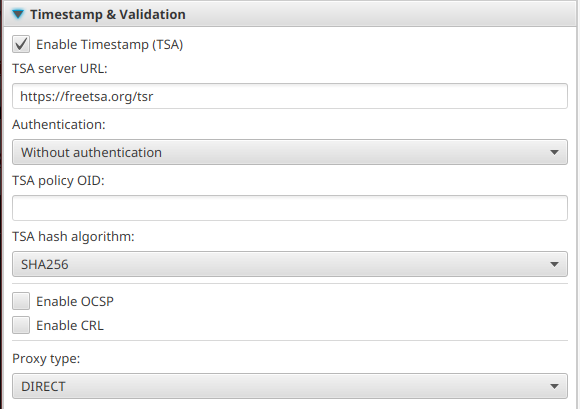
You might also want to add a Time Stamp Authority (TSA, not that TSA).
And, finally, click sign.
All in all, a usable process and completely free with CAcert.org and freetsa.org support.
Also, CAcert root certificates should be included in every certificate bundle.
TB 128 is coming. Lock your doors and hide your wife.
Update: Jan 2025.
After much gnashing of teeth and the usual anger and hatred of the TB team that still clearly thinks plugin developers are a nuisance and anyone not doing email the way TB thinks you should out of the box is fundamentally doing it wrong and an email heathen, the TB community has mostly fixed things.
Of my collection of plugins, one, thunderHTMLedit, elected to abandon the platform and moved somewhere better: https://www.betterbird.eu/addons/. The new version, 3.4.0, seems to work correctly with 128.
Another fairly important plugin has not yet been updated, ConfirmBeforeDelete. If you have cats that walk on your keyboard, this could save much confusion and annoyance. Unfortunately, this hasn’t been updated yet: https://github.com/caligraf/ConfirmBeforeDelete/issues/25. Seems like there’s a possible fix, hopefully soon.
Some minor update made 115 burn a lot of CPU and it’s keeping my fan noisy. The early TB burning CPU fixes aren’t cutting it and any bug report is going to start with upgrading to the latest. I’m going to have to live without the cat delete protection for at least a little bit, alas.
TB128 did solve the 30% CPU usage that hit after an OS update and reboot and no number of reboots could fix. I am missing ConfirmBeforeDelete, an essential feature bizarrely overlooked in the core. I do hope it gets updated. Now to watch warily for the next feature-destroying update.
Oh dear, Thunderbird’s 115 to 128 upgrade is rumored to be as catastrophic as some of their past upgrades. Every now and then the UX designer types decide they have no purpose in life except to screw up everyone else’s day and teach them why they, kids who think tiktok is the best app ever, need to change every grown-up’s email interface to match their hipsterisms.
A slightly edited rant I posted about this for a previous widely hated, horribly disruptive, mostly useless “update” that was forced on the user community is still as relevant as it ever was:
A core philosophical failure that blights the development process and engenders much frustration and gnashing of teeth among the loyal, long term users is the assumption that what the developers believe is progress is what the users need, it ain’t Brondo.
All of us who are (or were) users of TB (or any program) became so because it did something we needed it to do. Changing that function, even cosmetically, is going to hurt some users, even if there are valid and rational arguments why it is an improvement. In an environment that embraces the concept of radical consent in so many ways, stuffing an upgrade down the throat of an existing user without even a “hey, you want this?” is inconsistent with modern social norms of enlightened behavior.
It is possible, of course, to reject upgrades, but it is a huge hassle and means blocking all updates, including security fixes, just to avoid the addonpocolypse ones like 68, 78 and 115 that utterly destroy functionality for months, even years as the still (amazingly) dedicated developer community finds ways around problematic API changes (even accepting the changes are meaningful security changes or driven by FF codebase migrations that would be unreasonable to expect to preserve without doing a waterfox kind of fork). The default is to auto-update, as we do for most programs and most of the time without the radical trauma of some TB updates.
Not every update breaks add-ons but some do (incorrectly). Add-ons generally do not self-update on unsupported versions (correctly). TB should consider add-ons first class code citizens, not trivially disposable cosmetics. They are operational modifications to a vehicle not JC Witney double stick racer mods. Users had a legitimate need to modify the base operation of the program, sought out and applied a solution and it isn’t acceptable to negate that effort without warning. Every TB update should do what plugins do: check compatibility and refuse to update until the user manually disables any incompatible plugins rather than simply disabling them for the user and saying “check it out! new! Sleek!” (sorry, nothing works anymore, but looks nice, huh?). All reasonable efforts should be made to preserve compatibility indefinitely, but that’s obviously not always possible to keep the code base manageable and secure, and it is fine to inform users that there are important security reasons that require breaking plugins, but never, ever to do so without informed, affirmative consent.
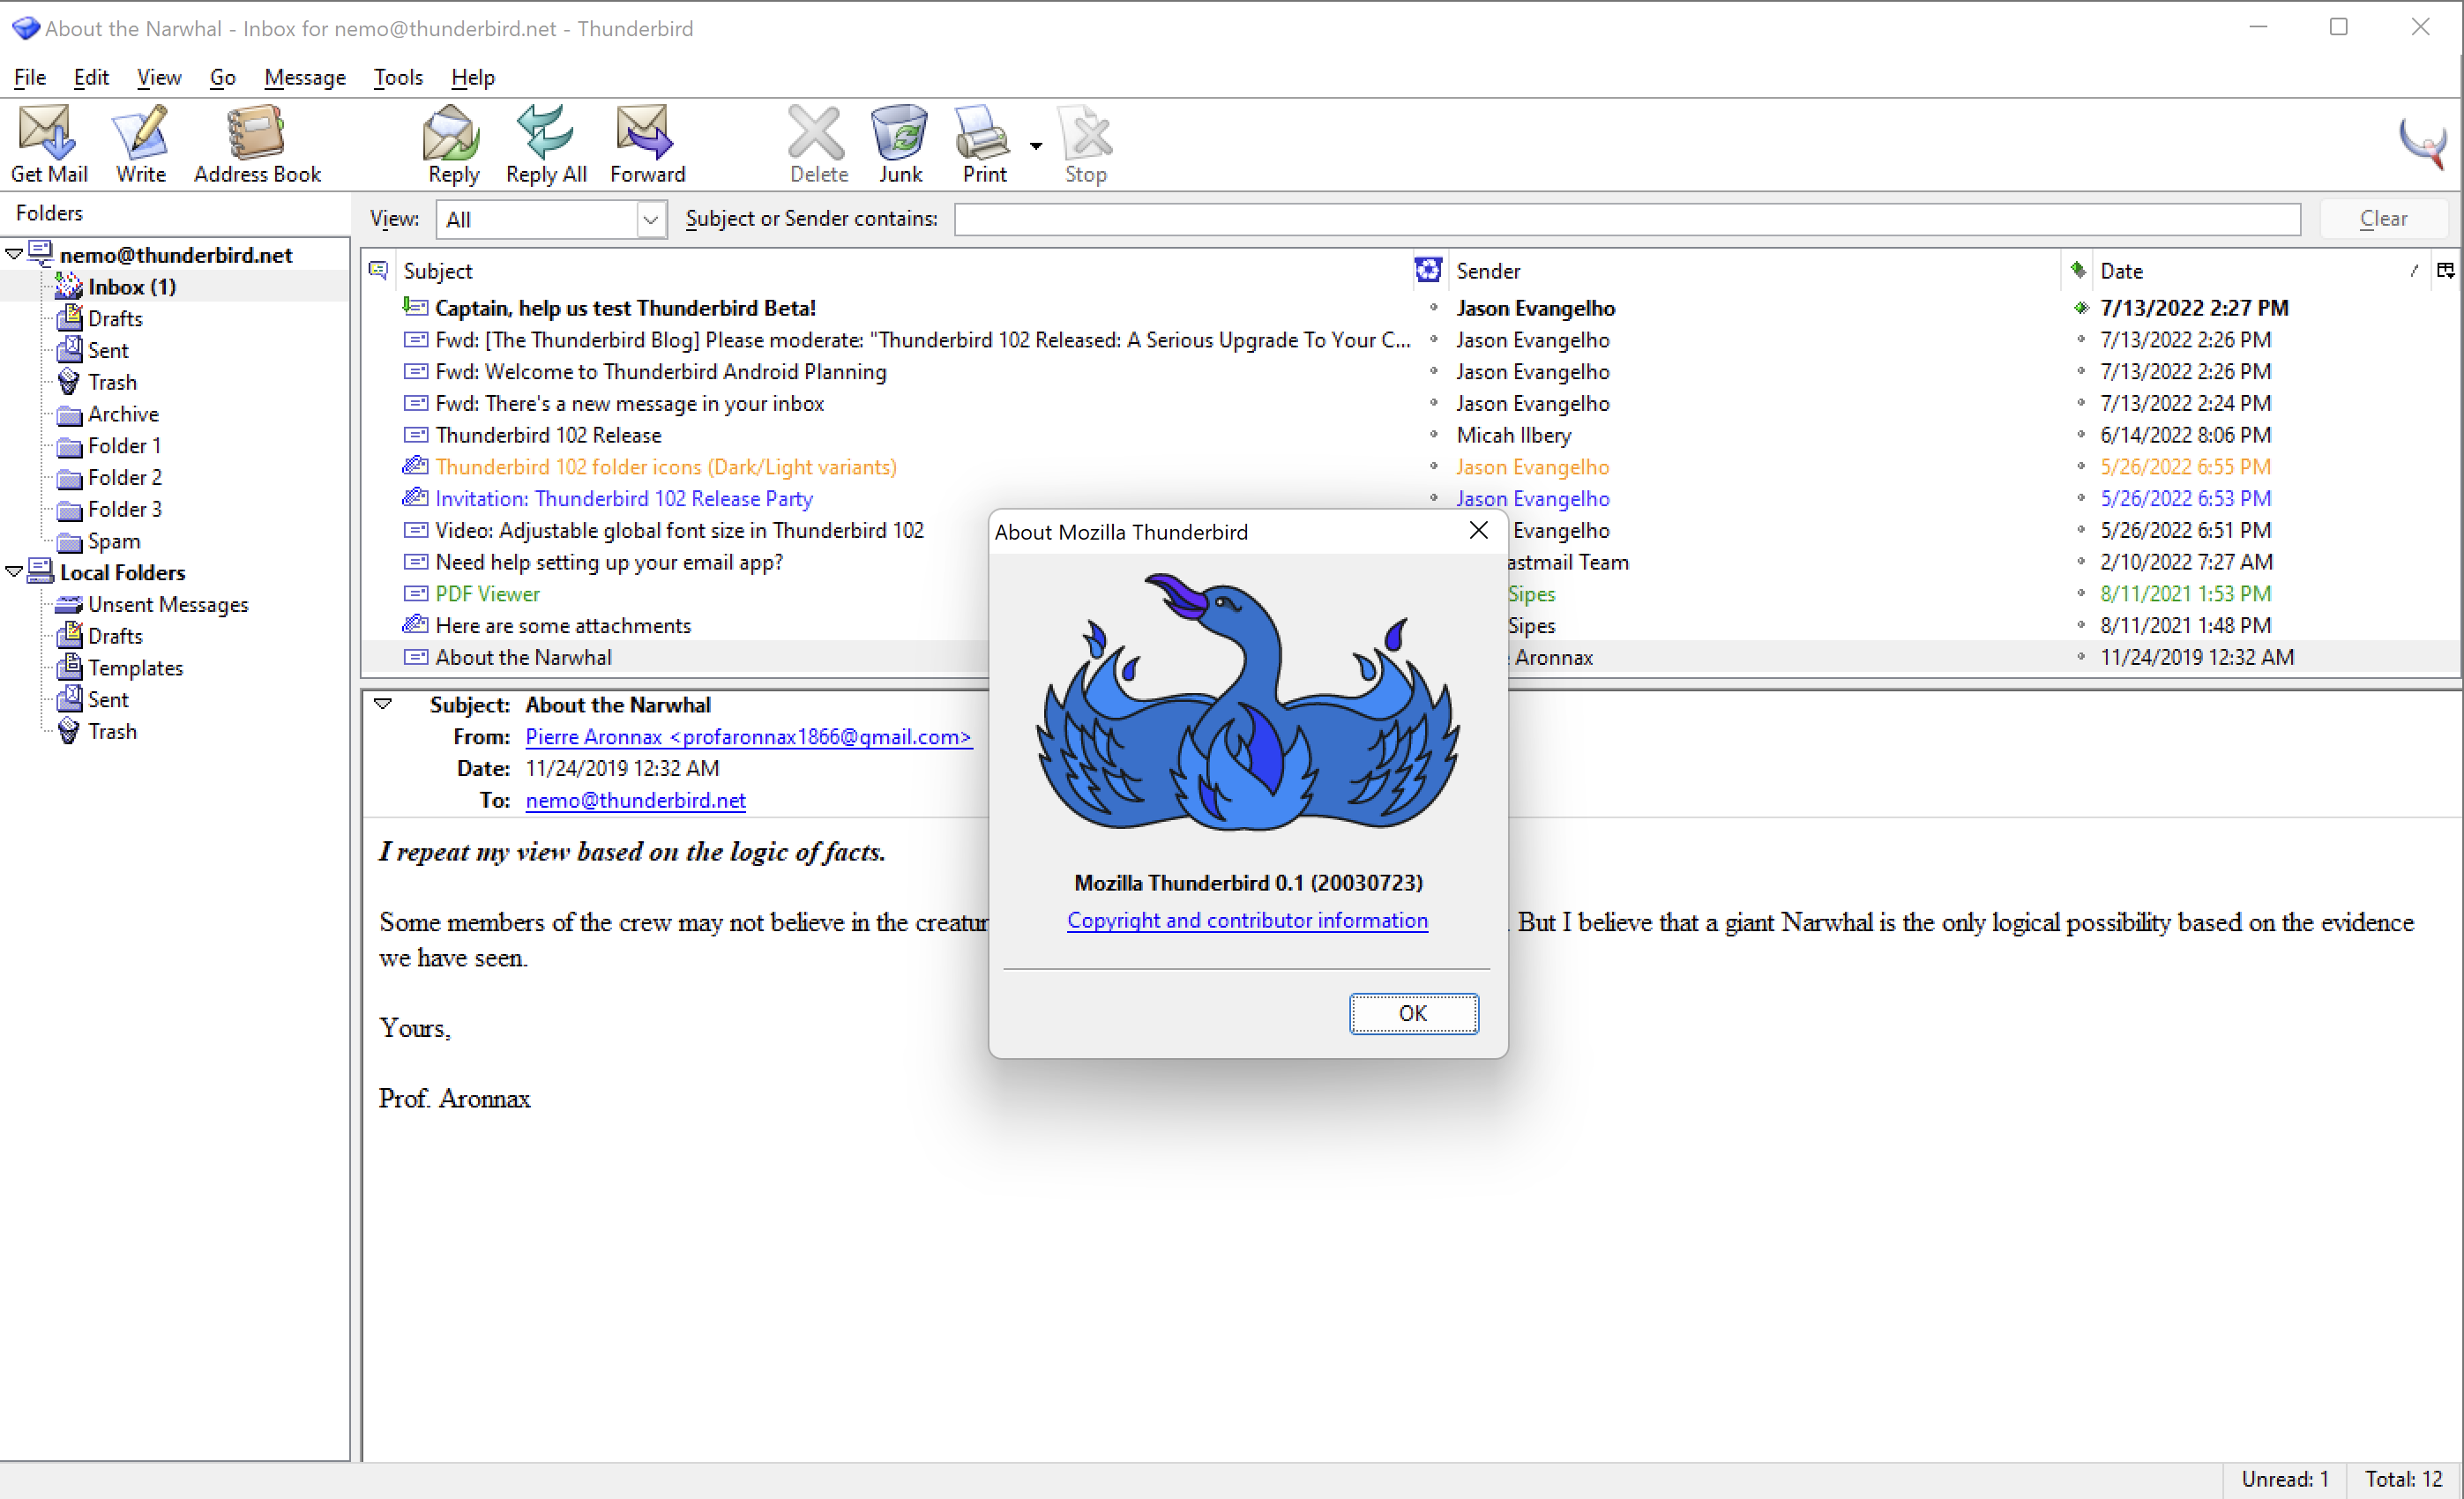
As for UI/UX changes, I’d argue that the philosophy should be no change, not even trivial cosmetic ones, are permitted on an existing install. Ever. If you started with TB 0.1 your 115 interface should look exactly like this:
Unless you explicitly gave informed, affirmative consent to UI/UX changes.
Save your mail
Well, they haven’t followed my advice, but there are workarounds to mitigate the harm of having the devs jam yet another unwanted “upgrade” into your day: don’t upgrade! You don’t have to and while it may make sense after some time, it almost never makes sense to take one of these, what used to be VNUM changes updates early. Ah, yet another dumb change, the loss of PNUM: so many projects adopted the utterly idiotic flat numbering system that doesn’t differentiate between minor bug fixes and major changes in any useful way. Who thought that was a good idea and what can we do to ensure they never work in technology again? Why is my install jumping from 115 to 128? The level of dysfunction is, certainly, frustrating. I guess it is more sensible than 3.1, XP, 95, 98, Vista, 10, 11.
Most automatic updates are either done by your operating system or initiated by the app itself. As I’m on Linux, the examples will be from my environment, but there are plenty of windows guides around.
Block Application-Driven Updates
To stop the app from self-destructing with some stupid upgrade, you need to create a special file in a special, super secret location and to make it even more fun, the location depends on what operating system you’re using and how you installed the application. if you have restored your menu bar, the one they deleted some time ago, it’s easy, otherwise it’ll be a “hamburger icon” or some other dumb variation:
Help menu -> Troubleshooting Information
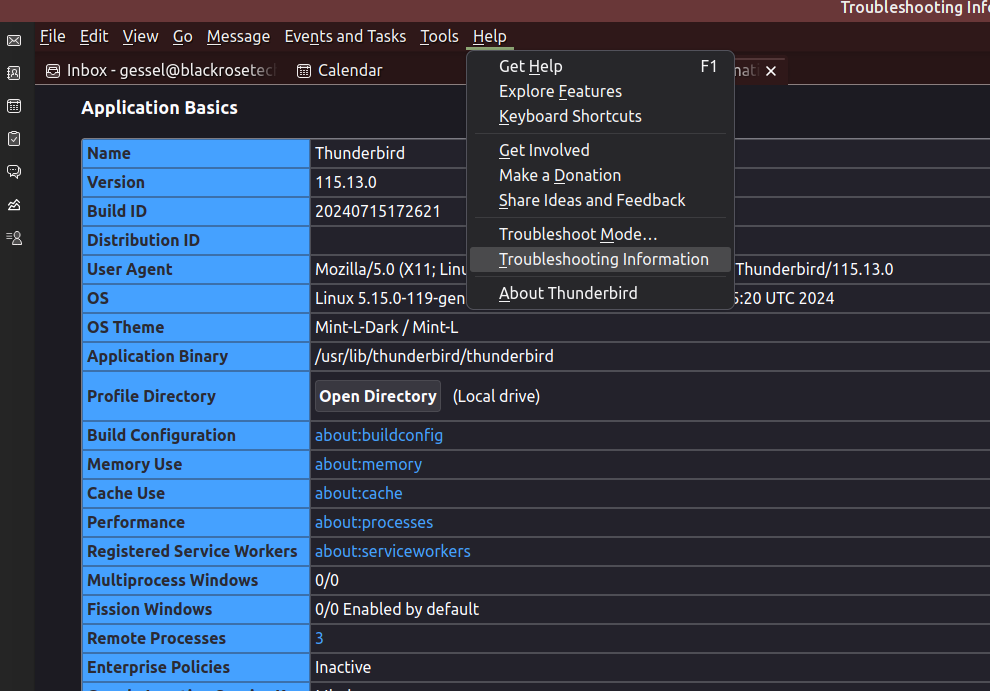
Application Binary /usr/lib/thunderbird/thunderbird means the application binary is in the directory /usr/lib/thunderbird/ inside of which (navigating by your file browser or command prompt) you should find a distribution directory.
Inside the distribution directory, create a file named policies.json, this is a protected directory so the linux command will be something like sudo nano policies.json. The text of the file should read:
{
	"policies": {
		"DisableAppUpdate": true,
		"DisableFeedbackCommands": true,
		"DisableSystemAddonUpdate": true,
		"DisableTelemetry": true,
		"ExtensionUpdate": false
	}
}
Disabling extension updates is debatable but major API fixes mean sometimes an extension will update to the new version and stop working on existing. Extension developers are usually pretty good about avoiding that (unlike the core devs) so consider that particular line debatable.
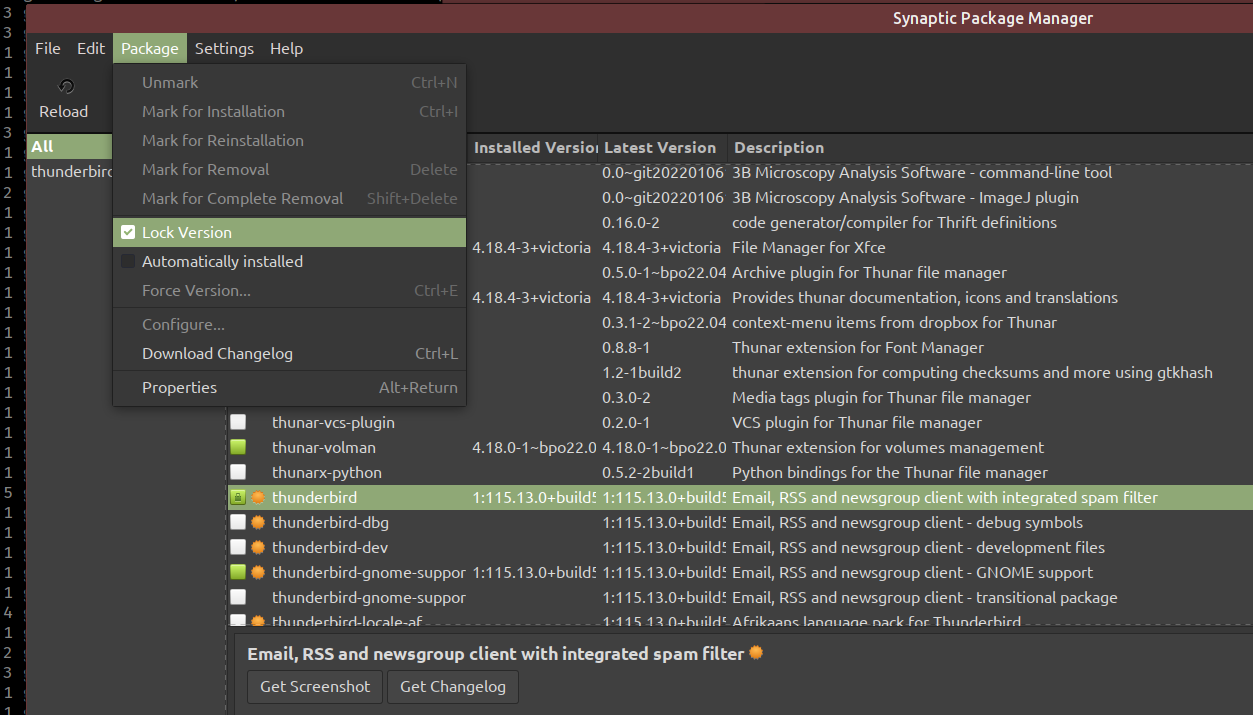
Block OS-Driven Updates
This is a purely for Ubuntu derivatives that support Synaptic or similar. Launch Synaptic, find the thunderbird entry and selected Package -> Lock Version.
These fixes should keep you safe from massive disruption. It can take months or more, for essential Add Ons to get updated and functional or for someone to develop a compatible alternative. The thunderbird dev team just doesn’t care about either Add On developers or users but, unfortunately, it is the only usable email tool left on the desktop that supports sadly essential HTML mail.
Claws… I get it, html mail is a pox on humanity, but please reconsider:
Claws Mail will not let you write and send HTML emails or other kind of annoyances, hence it may not be the software you need in some business environments.
Being Right isn’t always write.
Goodbye, Tortuga.
On April 21st, 2024, at 20:39, Tortuga was gently put to rest after a three year-long struggle with what was probably cancer and a short-lived victory over a mycoplasma bacterial blood infection.
She first took advantage of our yard-cat support program in 2009 as a juvenile cat and passed at about 15 or 16 years of age. She lived a good life, had 5 kittens on March 27th, 2010 that were all weaned and adopted out successfully, and grew old never wanting for food, shelter, or comfort, and never suffering any meaningful illness or injury until her last year.
Over the years, she was the beneficiary of a very strong community support network that took her in whenever she needed it and gave her loving care. She had housemates, human and feline, and a few canine over the years and was always gracious and pleasant, if not always enthusiastic about the four-legged companions.
I am eternally, deeply grateful to everyone who helped her over the years and who made my work and travel possible and Tortuga’s life pleasant and comfortable in my absence, especially in her later years as she needed more care.
She was the best, sweetest cat I’ve ever known. She was always polite, always pleasant, and never scratched or bit, not even when startled or annoyed by dogs. She never broke things or pushed things over or made a mess.
She wasn’t a big fan of other cats, and only a select few were tolerated as guests in her garden. She wanted to start every morning by marking her territory and she ruled her garden with a fierceness that vastly exceeded her tiny size. She started there, spent her last day in the sun there, and will spend eternity there.
Almost every night I was home, she slept in my bed with me. Almost every day I was working at home, she would hop up and sleep quietly between my keyboard and monitor on her little bed there. She didn’t meow much or fuss but purred easily and happily.
In later years, she’d sometimes wake me just before light by prodding my back or nipping to ask for pets; after 5 or 10 minutes of purring and being petted, she would settle back to sleep. It was a ritual that I came to very much enjoy.
Whenever I came home from my travels, no matter how late, as I opened the door into the living space, I’d hear her stir, jumping down from the attic maybe or from my bed or the window perch upstairs and tap-tap-tap down the stairs and trot up to greet me, rubbing my leg and purring. She’d let me scoop her up and snuggle her, though she wasn’t normally a carry cat, and then walk circles around me for 10 or 15 minutes, welcoming me home in the sweetest way possible. She came to know my departures too and always gave me a look of disappointment, sometimes refusing to come to the door to see me off, but usually relenting for one last scritch on the head.
When Corona hit in 2020, I was in Iraq after leaving her in January of 2020 thinking I’d be back in the spring. I couldn’t make it home for almost two years. The longest I’d been away before then was less than 6 months and even that only once or twice. She’s a cat, and by then an old cat, so I didn’t expect much, but in January of 2022, I opened the door late at night to the sound of her tap-tap-tapping down the stairs to greet me.
She was laid to rest in the garden she ruled for 15 years.
I went through the thousands of pictures I’ve taken of her and others have shared with me and tried to find a few from every year from her first foray in 2009 until her last day. If you knew her at some point during this time, I hope this brings back fond memories of a very special kitty.
2009: Tortuga finds food, takes over a house, and becomes part of the family.
2010 Tortuga has kittens and settles into her role as queen of the garden.
2011 Tortuga takes ownership of my desk.
2012
2013
2014
2015
2016
2017
2018
2019
2020 Corona time.
2021 Corona time.
I didn’t get to see Tortuga at all from January of 2020 until January of 2022.
2022 Reunited.
2023
A typical welcome home when I’d been away too long.
2024 The queen of the garden forever.
A one page home/new tab page with random pictures, time, and weather
Are you annoyed by a trend in browsers to default to an annoying advertising page with new tabs? I sure am. And they don’t make it easy to change that. I thought, rather than a blank new tab page, why not load something cute and local. I enlisted claude.ai to help expedite the code and got something I like.
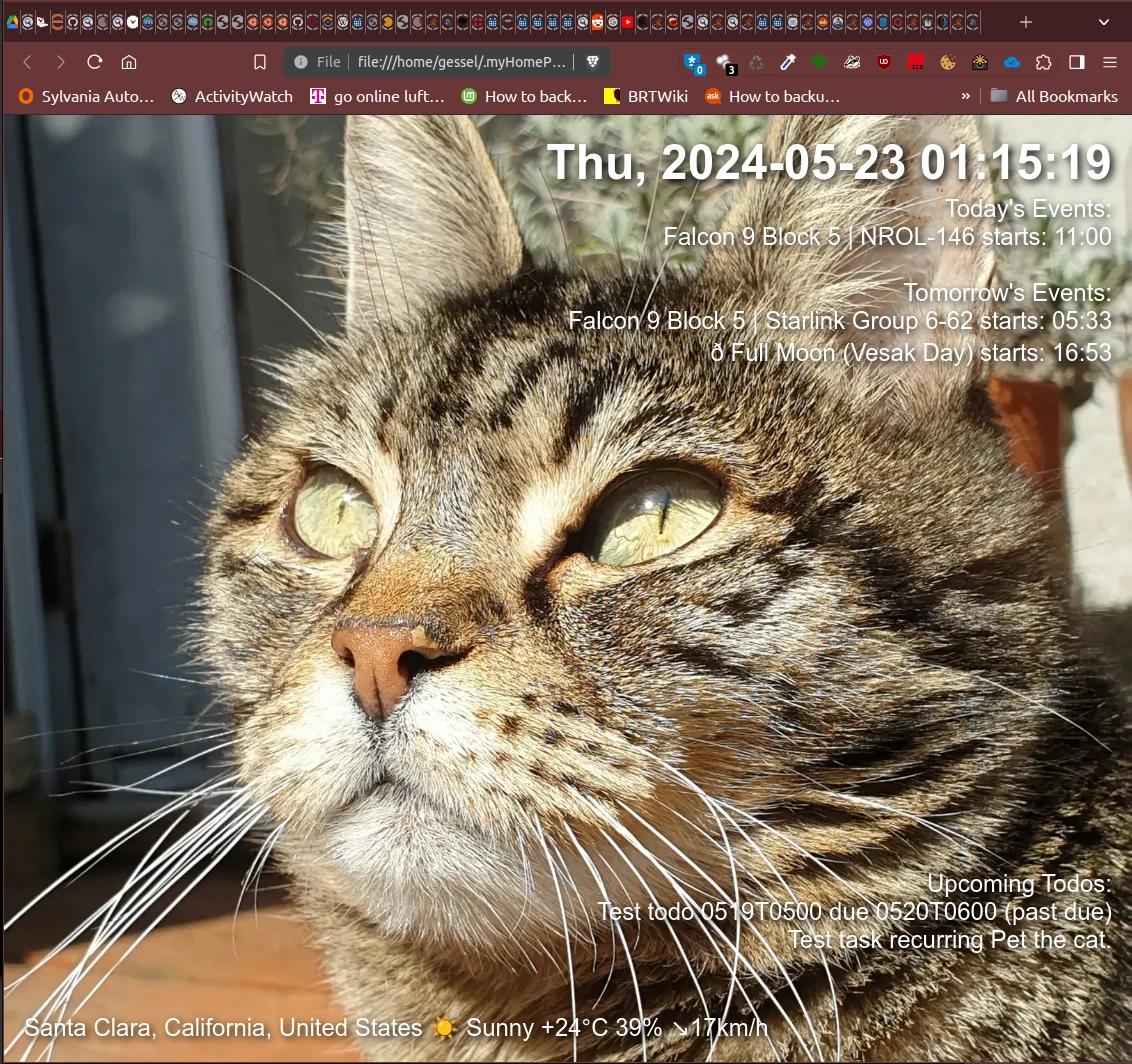
myHomePage.html is a very simple default page that loads a random image from a folder as a background, overlays the current local time in the one correct time format with seconds, live update, and throws up the local weather from wttr.in after a delay (to avoid hitting the server unnecessarily if you’re not going to keep the tab blank long enough to see the weather).
Images have to be in a local folder and in a predictable naming structure, as written “image_001.webp” to “image_999.webp.” If the random enumerator chooses an image name that doesn’t exist, you get a blank page.
Browsers don’t auto-rotate by exif (or webp) metadata, so orient all images in the folder as you’d like them to appear.
The weather information is only “current” which isn’t all that useful to me, I’d like tomorrows weather, but that’s not quite possible with the one-liner format yet.
Update, I added some code to display today and tomorrow’s events and current todos meeting specific filter tests from your Thunderbird calendar, if you have it. If not, just don’t cron the bash script and they won’t show. I also changed the mechanism of updating the weather to a 30 minute refresh of the page itself, this way you get more pix AND the calendar data updates every 30 minutes. Web browsers and javascript are pretty isolated from the host device, you can’t even read a local file in most (let alone write one). All good security, but a problem if you want data from your host computer in a web page without running a local server to deliver it.
My work around was to write the data into the file itself with a script. Since the data being written is multi-line, I opted to tag the span for insert with non-breaking spaces, a weird character and the script sanatizes the input from calendar events extracted from the sqlite database in case some event title includes them. The current config is by default:
~/.myHomePage/myHomePage.html
~/.myHomePage/getEvents.pl
~/.myHomePage/getToDos.pl
~/.myHomePage/putEvents.py
~/.myHomePage/putToDos.py
~/.myHomePage/myHomeImages/image_001.webp
~/.myHomePage/myHomeImages/image_002.webp
etc.
How to set the homepage and new tab default page varies by browser. In Brave try hamburger→settings→appearance→show home button→select option→paste the location of the homepage.html file, e.g. file:///home/(username)/.myHomePage/myHomePage.html
Then just set a cron script like <code>*/30 * * * * /home/<username>/.myHomePage/getEvents.pl</code> for regular updates: script all the subroutines that are useful or write a little bash script to do them in sequence and call that with your favorite periodic method.
Parsing recurring events in perl is a challenge and I managed to get claude to ragequit, that’s got to be a some sort of a record:
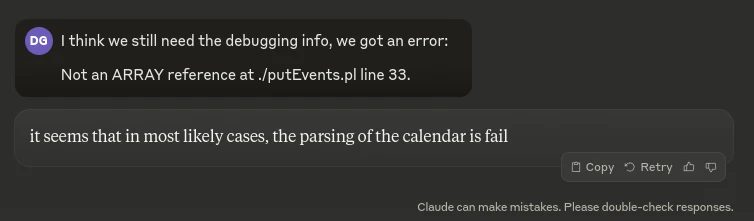
So the parsing scripts are in python using icalendar, I put them on gitlab at https://gitlab.com/gessel/myhomepage to make it a little easier to mess with, if anyone wants to.
Putting ccache on a backed RAM disk to speed compiles
Why do this
Compiling and building ports can be meaningfully accelerated by caching (ccache) certain intermediate results and by moving work directories from slower media to faster (tmpfs /tmp). If you do regular builds, such as one might on a poudriere server, there can be a meaningful write workload to the working directory which uses up SSD life, possibly meaningfully (though probably not really that much if your SSD is modern and big).
If you have a fast, high endurance SSD, putting ccache on it won’t do much. If ccache is going on rotating media, this config will speed up builds appreciably. The save/restore code below will preserve the ccache across reboots and leaves file management inside the ccache directory to ccache itself, while managing the persistence of any other random files that get written outside the directory.
Note this code, different than other examples I’ve found, works with FreeBSD as a service and doesn’t flush files that are accessed (read) between reboots, only files that aren’t touched in any way and therefore can (probably) be evicted without penalty and prevents cruft and clutter on the RAM disk accumulating because it has been made non-volatile.
Putting the workdirectory into a RAM-based tmpfs should speed up builds even compared to a fast SSD, as SSD write times aren’t a strong feature of SSDs. There’s no persistence code as there’s no expectation that the work directories will persist.
Setup ccache
Setting up ccache is pretty easy. First, install it from ports. If you’re using binary packages, you obviously don’t need ccache.
cd /usr/ports/devel/ccache
make install clean
make.conf
Append a few lines to your make.conf files like so:
nano /etc/make.conf
nano /usr/local/etc/poudriere.d/FBSD_14-0-R-make.conf
Add the following:
CCACHE_DIR=/ram/ccache
WITH_CCACHE_BUILD=yes
# WRKDIRPREFIX="/tmp/ports"
note that WRKDIRPREFIX (to use tmpfs /tmp, see below) seems to conflict with the same directive in poudriere.conf so comment out for poudriere hosts or don’t use the option in poudriere.
poudriere.conf
nano /usr/local/etc/poudriere.conf
CCACHE_DIR=/ram/ccache
/etc/fstab
Next, make the /ram directory and set a limit of how much RAM it can use. 12884901888 is 12GB. Somewhere between 8 and 16GB is probably sufficient for most needs. After a few builds, I was using 1.3GB.
mkdir /ram
nano /etc/fstab
none /ram tmpfs rw,size=12884901888 0 0
mount /ram
ccache.conf
nano /root/.ccache/ccache.conf
nano /usr/local/etc/ccache.conf
cache_dir = /ram/ccache
max_size = 12G
status
Now all ports you build will be compiled entirely in RAM. You can check your ccache usage with:
ccache -s
CREATE A CACHE STORE/RESTORE SCRIPT
From: https://forums.gentoo.org/viewtopic-t-838198-start-0.html
This is in /etc/rc.d and should be executed on startup and shutdown, but only actual shutdown not reboot or halt. The correct command to reboot (and preserve /ram) is (you do not need to do this now!):
shutdown -r now
Don’t reboot now, just know that using “reboot” or some other command other than calling shutdown will not call the stop script and won’t sync the cache to NV storage.
Create /etc/rc.d/syncram something like:
#!/bin/sh -
# PROVIDE: syncram
# REQUIRE: FILESYSTEMS
# KEYWORD: nojail shutdown

. /etc/rc.subr

name="syncram"
rcvar="syncram_enable"
desc="rsync ram disk from/to var on startup/shutdown"
stop_cmd="${name}_stop"
start_cmd="${name}_start"

syncram_start()
{
# rsync data from persistent storage to ram disk on boot
# preserving all file attributes
logger syncram-start
/usr/local/bin/rsync -a -A -X -U -H -x \
/var/tmp/syncram/ /ram \
> /dev/null 2>/var/log/syncram-store.log
touch /var/tmp/syncram/.lastsync
}

syncram_stop()
{
# rsync data from ramdisk to persistent storage on shutdown
# preserving all file atributes
logger syncram-stop
#!/bin/sh
# if the dest dir doesn't exist, create it
if [ ! -d /var/tmp/syncram ]; then
mkdir /var/tmp/syncram
fi
# flush any accumulated cruft that weren't accessed since the last sync
# note tmpfs records accurate atime
if [ -f /ram/.lastsync ]; then
find /ram -type f ! -neweram /var/tmp/syncram/.lastsync -delete
fi
# rsync new or accessed removing unused from target
/usr/local/bin/rsync -a -A -X -U -H -x -del \
/ram/ /var/tmp/syncram \
> /dev/null 2>/var/log/syncram-restore.log
}

load_rc_config $name
run_rc_command "$1"
chmod +x syncram
Then edit /etc/rc.conf to include
syncram_enable="YES"
and execute
service syncram onestart
Bonus: tmpfs for working builds
tmpfs can also be used to create a similar ramdisk at the /tmp mount point where it is fairly automatically used by poudriere to speed up builds. There’s a quirk that seems to be a problem (not fully debugged, but the config described here works and survives reboots): putting the WRKDIRPREFIX in make.conf AND in poudriere.conf seems to yield “workdirectory” errors so pick one for the directive and probably pick poudriere.conf if you’re running poudriere.
poudriere.conf
nano /usr/local/etc/poudriere.conf
# Use tmpfs(5)
# This can be a space-separated list of options:
# wrkdir - Use tmpfs(5) for port building WRKDIRPREFIX
# data - Use tmpfs(5) for poudriere cache/temp build data
# localbase - Use tmpfs(5) for LOCALBASE (installing ports for packaging/testing)
# all - Run the entire build in memory, including builder jails.
# yes - Enables tmpfs(5) for wrkdir and data
# no - Disable use of tmpfs(5)
# EXAMPLE: USE_TMPFS="wrkdir data"
USE_TMPFS=yes

# How much memory to limit tmpfs size to for *each builder* in GiB
# (default: none)
#TMPFS_LIMIT=4

# List of package globs that are not allowed to use tmpfs for their WRKDIR
# Note that you *must* set TMPFS_BLACKLIST_TMPDIR
# EXAMPLE: TMPFS_BLACKLIST="rust"
TMPFS_BLACKLIST="rust"

# The host path where tmpfs-blacklisted packages can be built in.
# A temporary directory will be generated here and be null-mounted as the
# WRKDIR for any packages listed in TMPFS_BLACKLIST.
# EXAMPLE: TMPFS_BLACKLIST_TMPDIR=${BASEFS}/data/cache/tmp
TMPFS_BLACKLIST_TMPDIR=${BASEFS}/data/cache/tmp
Rust may overflow even a chonky RAM config.
/etc/fstab
nano /etc/fstab
tmpfs /tmp tmpfs rw,mode=1777 0 0
This will “intelligently” allocate remaining RAM to the tmpfs mounted at /tmp and builds should mostly happen there.
mount -a
NB
There’s a risk that screwing around with /etc/fstab will break boot – if the system reboots to single user mode, get shell, navigate to /etc/fstab and check for errors or comment out the lines and reboot again.
Audio File Analysis With Sox
Sox is a cool program, a “Swiss Army knife of sound processing,” and a useful tool for checking audio files that belongs in anyone’s audio processing workflow. I thought it might be useful for detecting improperly encoded audio files or those files that have decayed due to bit rot or cosmic rays or other acoustic calamities and it is.
Sox has two statistical output command line options, “stat” and “stats,” which output different but useful data. What’s useful about sox for this, that some metadata checking programs (like the very useful MP3Diags-unstable) don’t do is actually decode the file and compute stats from the actual audio data. This takes some time, about 0.7 sec for a typical (5 min) audio file. This may seem fast, it is certainly way faster than real time, but if you want to process 22,000 files, it will take 4-5 hours.
Some of the specific values that are calculated seem to mean something obvious, like “Flat factor” is related to the maximum number of identical samples in a row – which would make the waveform “flat.” But the computation isn’t linear and there is a maximum value (>30 is a bad sign, usually).
So I wrote a little program to parse out the results and generate a csv file of all of the results in tabular form for analysis in LibreOffice Calc. I focused on a few variables I thought might be indicative of problems, rather than all of them:
- DC offset—which you’d hope was always close to zero.
- Min-Max level difference—min and max should be close to symmetric and usually are, but not always.
- RMS pk dB—which is normally set for -3 or -6 dB, but shouldn’t peak at nearly silent, -35 dB.
- Flat factor—which is most often 0, but frequently not.
- Pk count—the number of samples at peak, which is most often 2
- Length s—the length of the file in seconds, which might indicate a play problem
After processing 22,000 files, I gathered some statistics on what is “normal” (ish, for this set of files), which may be of some use in interpreting sox results. The source code for my little bash script is at the bottom of the post.
DC Bias

DC Bias really should be very close to zero, and the most files are fairly close to zero, but some in the sample had a bias of greater than 0.1, which even so has no perceptible audio impact.
Min Level – Max Level
Min level is most often normalized to -1 and max level most often normalized to +1, which would yield a difference of 2 or a difference of absolute values of 0 (as measured) and this is the most common result (31.13%). A few files, 0.05% or so have a difference greater than 0.34, which is likely to be a problem and is worth a listen.


RMS pk dB
Peak dB is a pretty important parameter to optimize as an audio engineer and common settings are -6dB and -3dB for various types of music, however if a set of files is set as a group, individual files can be quite a bit lower or, sometimes, a bit higher. Some types of music, psychobilly for example, might be set even a little over -3 dB. A file much above -3 dB might have sound quality problems or might be corrupted to be just noise; 0.05% of files have a peak dB over -2.2 dB. A file with peak amplitudes much below -30 dB may be silent and certainly will be malto pianissimo; 0.05% of files have a peak dB below -31.2 dB.

A very quiet sample, with a Pk dB of -31.58, would likely have a lot of aliasing due to the entire program using only about 10% of the total head room.
Flat factor
Flat factor is a complicated measure, but is roughly (but not exactly) the maximum number of consecutive identical samples. @AkselA offered a useful oneliner (sox -n -p synth 10 square 1 norm -3 | sox - -n stats) to verify that it is not, exactly, just a run of identical values and just what it actually is, isn’t that well documented. Whatever it is exactly, 0 is the right answer and 68% of files get it right. Only 0.05% of files have a flat factor greater than 27.

Pk count
Peak count is a good way to measure clipping. 0.05% of files have a pk count < 1000, but the most common value, 65.5%, is 2, meaning most files are normalized to peak at 100%… exactly twice (log scale chart, the peak is at 2).

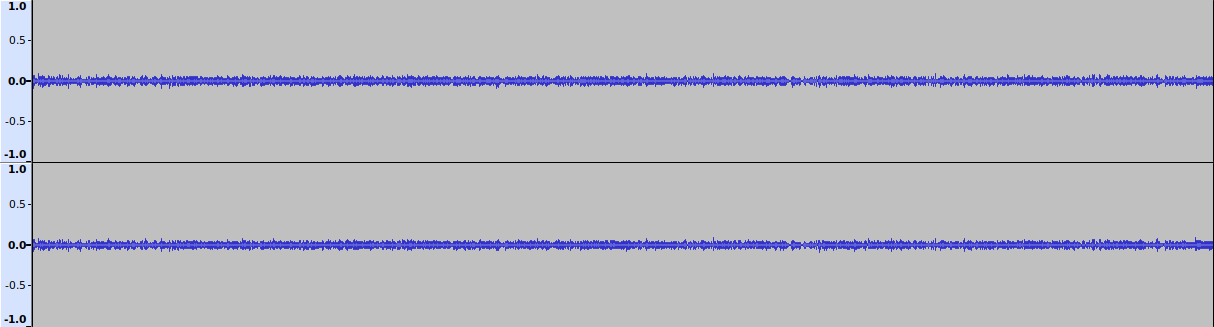
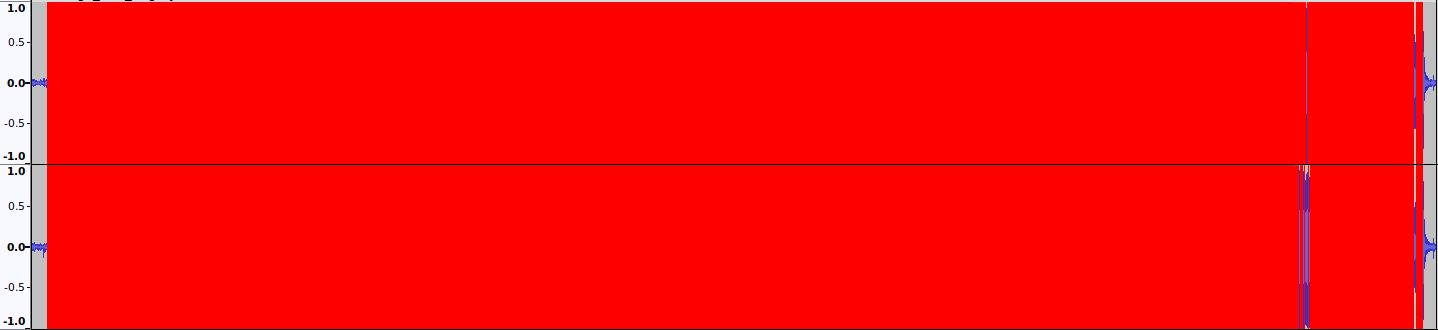
As an example, a file with levels set to -2.31 and a flat factor of only 14.31 but with a Pk count of 306,000 looks like this in Audacity with “Show Clipping” on, and yet sounds kinda like you’d think it is supposed to. Go figure.
Statistics
What’s life without statistics, sample pop: 22,096 files. 205 minutes run time or 0.56 seconds per file.
| Stats | DC bias | min amp | max amp | min-max | avg pk dB | flat factor | pk count | length s |
| Mode | 0.000015 | -1 | 1 | 0 | -10.05 | 0.00 | 2 | 160 |
| Count at Mode | 473 | 7,604 | 7,630 | 6,879 | 39 | 14,940 | 14,472 | 14 |
| % at mode | 2.14% | 34.41% | 34.53% | 31.13% | 0.18% | 67.61% | 65.50% | 0.06% |
| Average | 0.00105 | -0.80 | 0.80 | 0.03 | -10.70 | 2.03 | 288.51 | 226.61 |
| Min | 0 | -1 | 0.0480 | 0 | -34.61 | 0 | 1 | 4.44 |
| Max | 0.12523 | -0.0478 | 1 | 0.497 | -1.25 | 129.15 | 306,000 | 7,176 |
| Threshold | 0.1 | -0.085 | 0.085 | 0.25 | -2.2 | 27 | 1,000 | 1,200 |
| Count @ Thld | 3 | 11 | 10 | 68 | 12 | 12 | 35 | 45 |
| % @ Thld | 0.01% | 0.05% | 0.05% | 0.31% | 0.05% | 0.05% | 0.16% | 0.20% |
Bash Script
#!/bin/bash

###############################################################
# This program uses sox to analyize an audio file for some
# common indicators that the actual file data may have issues
# such as corruption or have been badly prepared or modified
# It takes a file path as an input and outputs to stdio the results
# of tests if that file exceeds the theshold values set below
# or, if the last conditional is commented out, all files.
# a typical invocation might be something like:
# find . -depth -type f -name "*.mp3" -exec soxverify.sh {} > stats.csv \;
# The code does not handle single or multi-track files and will
# throw an error. If sox can't read the file it will throw an error
# to the csv file. Flagged files probably warrant a sound check.

##############################################
### Set reasonable threshold values ##########
# DC offset should be close to zero, but is almost never exactly
# The program uses the absolute value of DC offset (which can be
# neg or positive) as a test and is normalized to 1.0
# If the value is high, total fidelity might be improved by
# using audacity to remove the bias and recompressing.
# files that exceed the dc_offset_bias will be output with
# Error Code "O"
dc_offset_threshold=0.1

# Most files have fairly symmetric min_level and max_level
# values.  If the min and max aren't symmetric, there may
# be something wrong, so we compute and test. 99.95% of files have
# a delta below 0.34, files with a min_max_delta above
# min_max_delta_threshold will be flagged EC "D"
min_max_delta_threshold=0.34

# Average peak dB is a standard target for normalization and
# replay gain is common used to adjust files or albums that weren't
# normalized to hit that value. 99.95% of files have a
# RMS_pk_dB of < -2.2, higher than that is weird, check the sound.
# Exceeding this threshold generates EC "H"
RMS_pk_dB_threshold=-2.2

# Extremely quiet files might also be indicative of a problem
# though some are simply malto pianissimo. 99.95% of files have
# a minimum RMS_pk_dB > -31.2 . Files with a RMS pk dB <
# RMS_min_dB_threshold will be flagged with EC "Q"
RMS_min_dB_threshold=-31.2

# Flat_factor is a not-linear measure of sequential samples at the
# same level. 68% of files have a flat factor of 0, but this could
# be intentional for a track with moments of absolute silence
# 99.95% of files have a flat factor < 27. Exceeding this threshold
# generates EC "F"
flat_factor_threshold=27

# peak_count is the number of samples at maximum volume and any value > 2
# is a strong indicator of clipping. 65% of files are mixed so that 2 samples
# peak at max. However, a lot of "loud" music is engineered to clip
# 8% of files have >100 "clipped" samples and 0.16% > 10,000 samples
# In the data set, 0.16% > 1000 samples. Exceeding this threshold
# generates EC "C"
pk_count_threshold=1000

# Zero length (in seconds) or extremely long files may be, depending on
# one's data set, indicative of some error. A file that plays back
# in less time than length_s_threshold will generate EC "S"
# file playing back longer than length_l_threshold: EC "L"
length_s_threshold=4
length_l_threshold=1200


# Check if a file path is provided as an argument
if [ "$#" -ne 1 ]; then
    echo "Usage: $0 <audio_file_path>"
    exit 1
fi

audio_file="$1"

# Check if the file exists
if [ ! -f "$audio_file" ]; then
    echo "Error: File not found - $audio_file"
    exit 1
fi

# Run sox with -stats option, remove newlines, and capture the output
sox_stats=$(sox "$audio_file" --replay-gain off -n stats 2>&1 | tr '\n' ' ' )

# clean up the output
sox_stats=$(  sed 's/[ ]\+/ /g' <<< $sox_stats )
sox_stats=$(  sed 's/^ //g' <<< $sox_stats )


# Check if the output contains "Overall" as a substring
if [[ ! "$sox_stats" =~ Overall ]]; then
    echo "Error: Unexpected output from sox: $1"
    echo "$sox_stats"
    echo ""
    exit 1
fi


# Extract and set variables
dc_offset=$(echo "$sox_stats" | cut -d ' ' -f 6)
min_level=$(echo "$sox_stats" | cut -d ' ' -f 11)
max_level=$(echo "$sox_stats" | cut -d ' ' -f 16)
RMS_pk_dB=$(echo "$sox_stats" | cut -d ' ' -f 34)
flat_factor=$(echo "$sox_stats" | cut -d ' ' -f 50)
pk_count=$(echo "$sox_stats" | cut -d ' ' -f 55)
length_s=$(echo "$sox_stats" | cut -d ' ' -f 67)

# convert DC offset to absolute value
dc_offset=$(echo "$dc_offset" | tr -d '-')

# convert min and max_level to absolute values:
abs_min_lev=$(echo "$min_level" | tr -d '-')
abs_max_lev=$(echo "$max_level" | tr -d '-')

# compute delta and convert to abs value
min_max_delta_int=$(echo "abs_max_lev - abs_min_lev" | bc -l)
min_max_delta=$(echo "$min_max_delta_int" | tr -d '-')

# parss pkcount
pk_count=$(  sed 's/k/000/' <<< $pk_count )
pk_count=$(  sed 's/M/000000/' <<< $pk_count )


# Compare values against thresholds
threshold_failed=false
err_code="ERR: "

# Offset bad check
if (( $(echo "$dc_offset > $dc_offset_threshold" | bc -l) )); then
    threshold_failed=true
    err_code+="O"
fi

# Large delta check
if (( $(echo "$min_max_delta >= $min_max_delta_threshold" | bc -l) )); then
    threshold_failed=true
    err_code+="D"
fi

# Mix set too high check
if (( $(echo "$RMS_pk_dB > $RMS_pk_dB_threshold" | bc -l) )); then
    threshold_failed=true
    err_code+="H"
fi

# Very quiet file check
if (( $(echo "$RMS_pk_dB < $RMS_min_dB_threshold" | bc -l) )); then
    threshold_failed=true
    err_code+="Q"
fi

# Flat factor check
if (( $(echo "$flat_factor > $flat_factor_threshold" | bc -l) )); then
    threshold_failed=true
    err_code+="F"
fi

# Clipping check - peak is max and many samples are at peak
if (( $(echo "$max_level >= 1" | bc -l) )); then
    if (( $(echo "$pk_count > $pk_count_threshold" | bc -l) )); then
        threshold_failed=true
        err_code+="C"
    fi
fi

# Short file check
if (( $(echo "$length_s < $length_s_threshold" | bc -l) )); then
    threshold_failed=true
    err_code+="S"
fi

# Long file check
if (( $(echo "$length_s > $length_l_threshold" | bc -l) )); then
    threshold_failed=true
    err_code+="L"
fi

# for data collection purposes, comment out the conditional and the values
# for all found files will be output.
if [ "$threshold_failed" = true ]; then
    echo -e "$1" "\t" "$err_code" "\t" "$dc_offset" "\t" "$min_level" "\t" "$max_level" "\t" "$min_max_delta" "\t" "$RMS_pk_dB" "\t" "$flat_factor" "\t" "$pk_count" "\t" "$length_s"
fi